Doppelganger
The puzzle platformer with a twist. Player can use a “Focus” power, the ability to bend a dimension to overcome the obstacle.
game: https://csaratakij.itch.io/doppelganger
walkthrough: https://www.youtube.com/watch?v=t01DpSmG0PQ
respository: https://github.com/CSaratakij/DG-Script-Only
responsible: game system
other member:
Nutthan Lekprasan (game designer)
Jetniphat Likhitwatthanasakun (artist)
Introduction#
Before you read any further, I have to warn you. There are some spoiler of the puzzle in this game. Please play the game first to avoid any spoiler.
This game is the entry for The Twentieth National Software Contest: NSC 2018. We have about 3 months to finish this project.
We manage to get the 2nd runner up in “Program for entertainment” .
Since I mainly do a game system and some of the game design, I will cover these topics with in depth. However, I will leave the art aspect to the artist himself.
Why this game call “Doppelganger”#
If you already play the game, you will notice that there isn’t a single doppelganger in this game. We name this game “Doppelganger” at first because we want the game to do something about a clone of our player character.
Turns out, none of the things we discuss in the early stage made it into the final product. Most of the things in the game come from a first month we made doing a rappid prototype and play testing a lot.
But this is the entry for the contest, We cannot change our name mid-way due to the proposal we sent during the first round of the competition. So we kinda have to live with that.
The origin of the “Focus” ability#
Once we decide this is gonna be a 2d side scroller, I finish implementing the player controller shortly after that. But there is no core gameplay loop yet. So I have to experiment something quick.
During that time, I saw a game that playing with a clone of player concept like our early idea. I don’t remember the exact name of this game, but the mechanic is very similar to “Binary Land”.
That’s when I realized, I actually didn’t think about this enough. So I start looking for the inspiration in itch.io.
After playing a bunch of weird game, One of the idea come up to my mind.
I remember playing some space shooter game that have a wrapping machanic. If you go near the end of the screen, you will wrap yourself back to the opposite side of the screen you came from.
I think this is quite interesting, what if a 2d side scroller can do that?
So, I do a quick prototype and make our play testing.
We kinda have a short discussion about how this can work with our doppelganger idea.
Then one of my team notice the similarity in the game that already publish. That game is Four Sided Fantasy (Damn…It’s hard to be original these day).
Actually, I don’t mind if this game is similar to that game and I really like this mechanic. But I have to keep exploring this deeper to see the other possibility, What cools thing we can do, if player have an ability to wrap themself?
One of the thing I remember experiment with was…
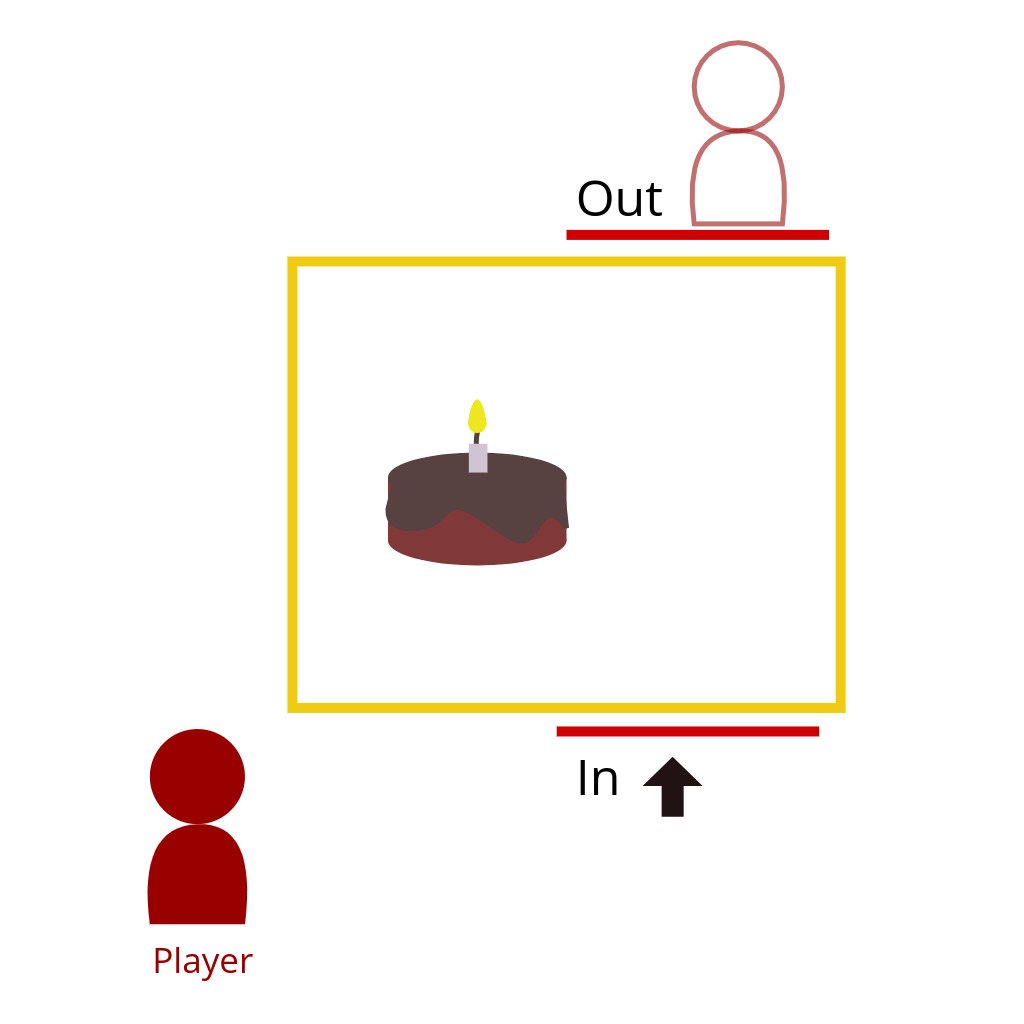
" What if the world wrapping box place outside of the player and it isn’t the thing that player can control and it just sit there in the level? " ( Sorry, no cake for you )
There is other problem as well, the gating problem.
Gating is how the game limit the player progression, in this case is how to prevent player to bypass our obstacle with ease.
The normal obstacle in the 2d side scroller is the height of the wall. But the world wrapping mechanic is really an over power ability. It can bypass this type of obstacle easily and making it harder to design the game level around this.
This is especially true if the world wrapping box size itself fit to the entire screen. So, I decide to just nerf this ability.
Instead of making it fit to the whole screen, Why not shrink it down to the smaller size and just place those world wrapping box at the center of the player.
I make a play testing again, and give this prototype to our game designer.
I let him come up with the combination of the level with this over power ability in mind. (a lot of his levels appear in the final product as well)
Once I tested, I quickly realized…
“You know what?, this world wrapping mechanic can make the typical puzzle in puzzle platformer much more interesting.”
So I decide to combine puzzle platformer with the world wrapping mechanic (focus), and it turns out to be fun.
Now we have a core gameplay loop.
A short term goals of the player is to figure out how to keep progressing further by solving the well place obstacle with a focus ability.
At the end, our entire month was gone. But we have a strong starting point and an interesting mechanic worth exploring.
Things that I implemented#
This is the technical aspect of the project and it’s quite long. If you aren’t interested in this topic, you can skip to How we design a game pacing .
Game System#
Player Controller
This is the first thing I finished implementing.
Without knowing what the game is gonna look like at first, I took an easiest way possible to approach this by making it based on the physics engine.
In which you can call this a “Physics based platformer”.
As the result, I have to fight the physics engine because in reallity the character wasn’t behave in the way the normal physics would behave as the physics engine estimate.
The better ways to do the platformer in general is to not rely on the physics engine and roll your own based on the specific need of your current project.
All the physics based platformer suffer from the floatlyness in which is the feeling of not in control of character.
Making the tight platformer controls by based around the physics engine it’s just a brute force process of tweaking a multiple parameters of the physics engine to get the result closest to what you want.
There is still a cost to pay, because the root cause of the floatlyness is not resolve.
All you can do is to mitigate its effect.
Take a look at Celeste.
One of the game that have a tight and satify player controller in the platformer genere.
They need to nail this stuff, because in Celeste there are a ton of platform session that require a percise jump from the player.
This is not possible if you based it around a physics engine.
Lucky for me, this game is not really having a lot of the platform session and it didn’t require a percise jump.
This allow me to focus on the other aspect of the project without having to re-implement the player controller.
Although, I love a tight control feeling of the platformer in general. (Like in Celeste)
If I have a chance to remake this game, This will be the first thing I want to re-implement.
Now, let’s talk about the implementation detail of player controller.
Walking
Nothing fancy here.
Just get the move direction from the input and move its character according to its move speed.
Since I use the physics engine, I need to add a physics material and low the friction value to 0 to prevent its collider from getting stuck when character is in the air while bumping to the wall.
The footstep sound effect will play while character moving around, and its sound effect will pick based on the game object tag that found by a simple raycast.
As for the movement when staying on top of the platform, I translate character with the same velocity as the platform itself whenever player found a platform by overlap testing around the feet of character.
Jumping
There are low and high jump in this game.
This is possible by manipulate a gravity based on the way player press their jump button.
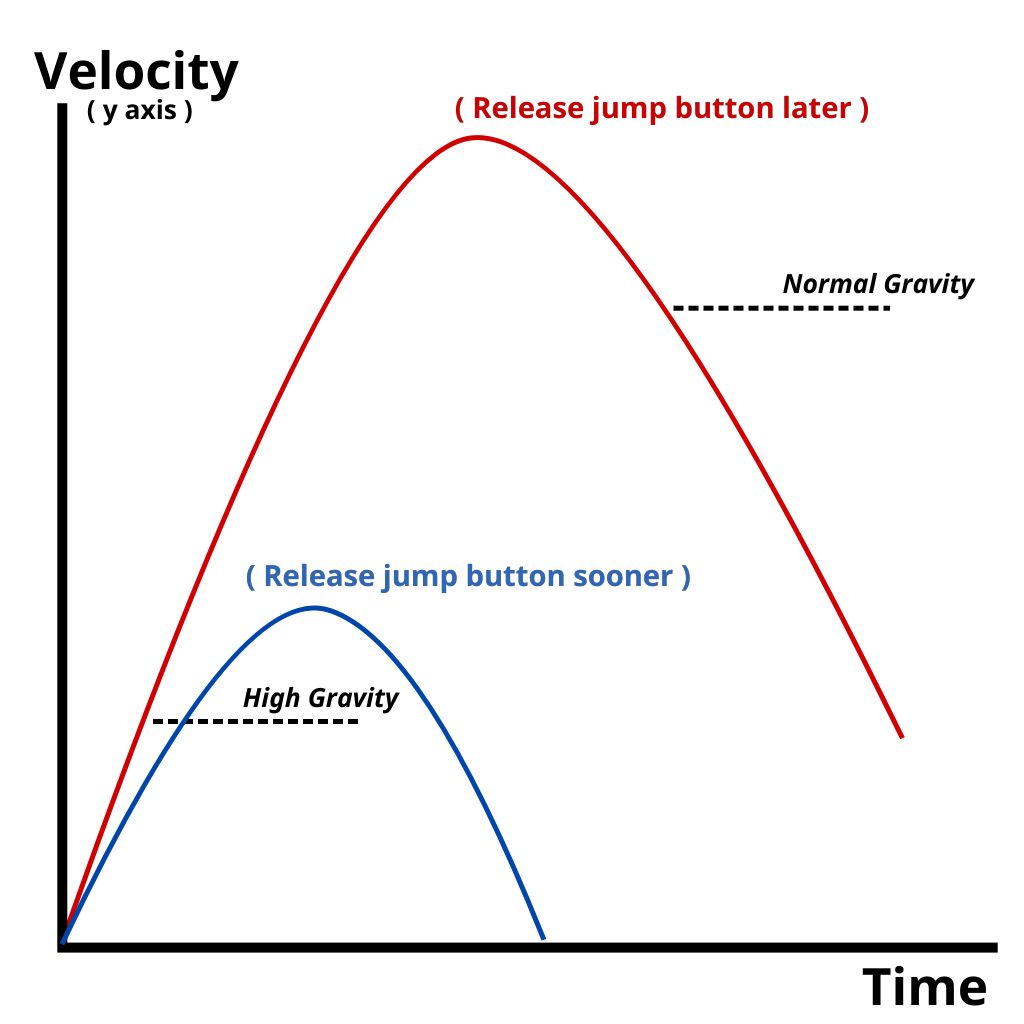
Normally, player will experience a normal gravity.
At the moment player starting to press the jump button, I will add the upward force to the character once.
After that, I still checking for the key press but it won’t add the force to the character anymore.
If player keep holding down the jump button until the character starting to fall, player will experience the normal gravity.
But if player release their jump button before the character reach to the highest jump possible, player will experience a higher gravity forcing the character to fall down sooner than it would normally be.
As for the ground detection, I use overlap testing instead of the multiple raycast.
The issue that come with this is I have to avoid unnecessary allocation at every fixed update cycle.
Because, I don’t want a Garbage Collector (GC) to kick in cleaning the stuff during gameplay making it look like a random freeze (spike) in the player perspective.
So, I have to pre-allocate, make a buffer and change the overlap testing method to the stuff that support a buffer.
The wall jumping mechanic is using a ray cast around a character feet to check if there is a wall at the same direction that player is currently facing.
If it successfully detect the wall, player will get the additional jump at about 63 degree up.
One way collision is using a built in Unity solution.
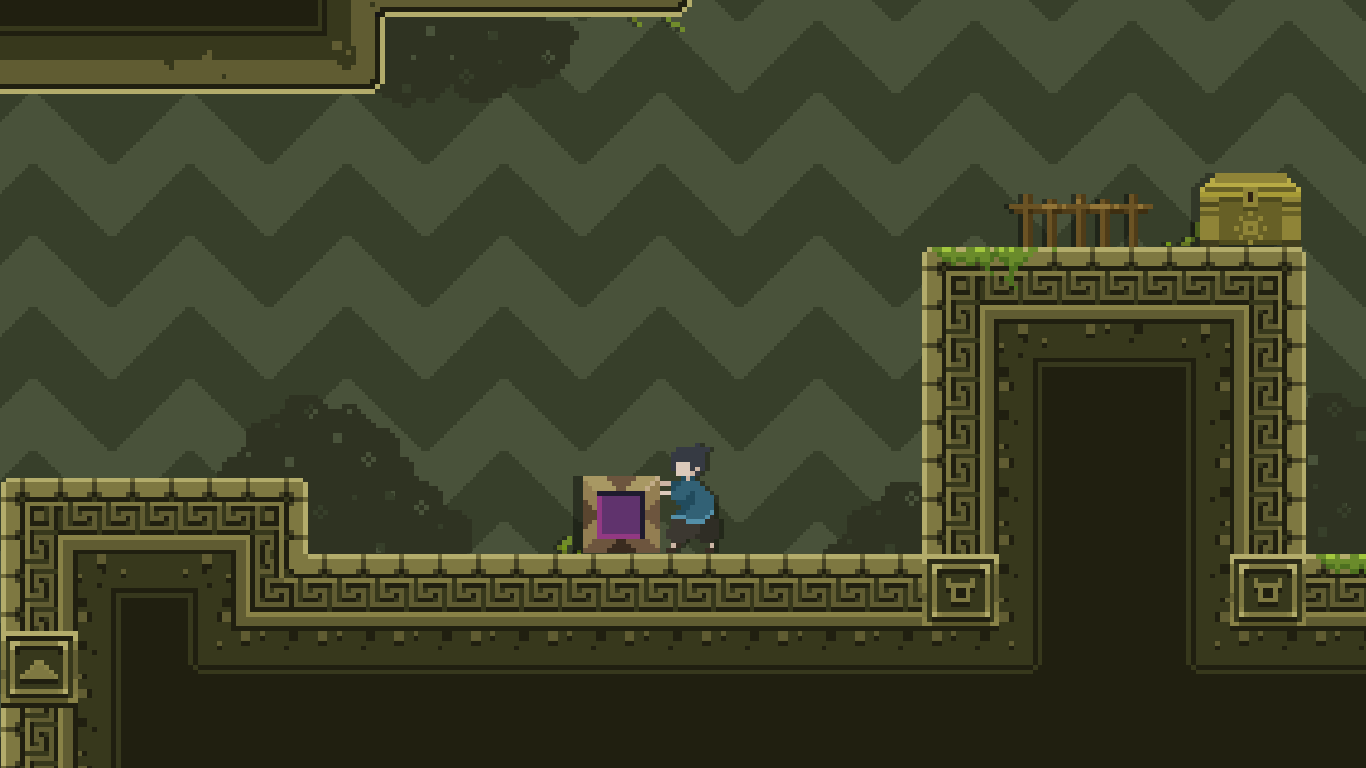
Push & Pull box
Push and pull box have two states.

Before grab
The box will have a mass different than a player character to prevent it from moving with a simple bump from the character collider.
If player getting closer to a box, it will show which key to make player able to grab itself.
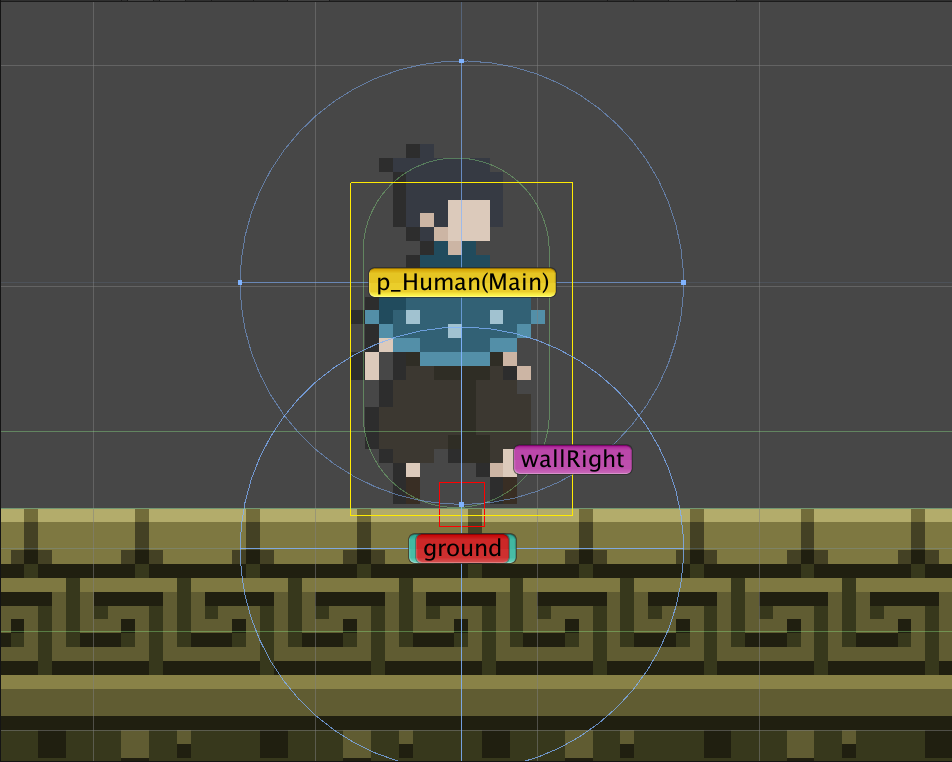
During grab
After player successfully grab a box, it will move along with the character.
It will keep checking if player is still closer to the box by simply overlap testing.
I have to keep testing it during fixed update cycle because the OnTriggerStay message is not a reliable way to test if something is still overlaping on something.
The area of testing is draw by using a Gizmos, a yellow rectangle that surround the box.
If player stop overlapping to the area of testing, I will stop player from grabbing a box.
Camera System
I use orthogonal view as a default. ( Of course, It’s a 2d game anyway )
The reason I support only 16:9 screen ratio is because this game puzzle is playing with a camera and design with this screen ratio as a default.
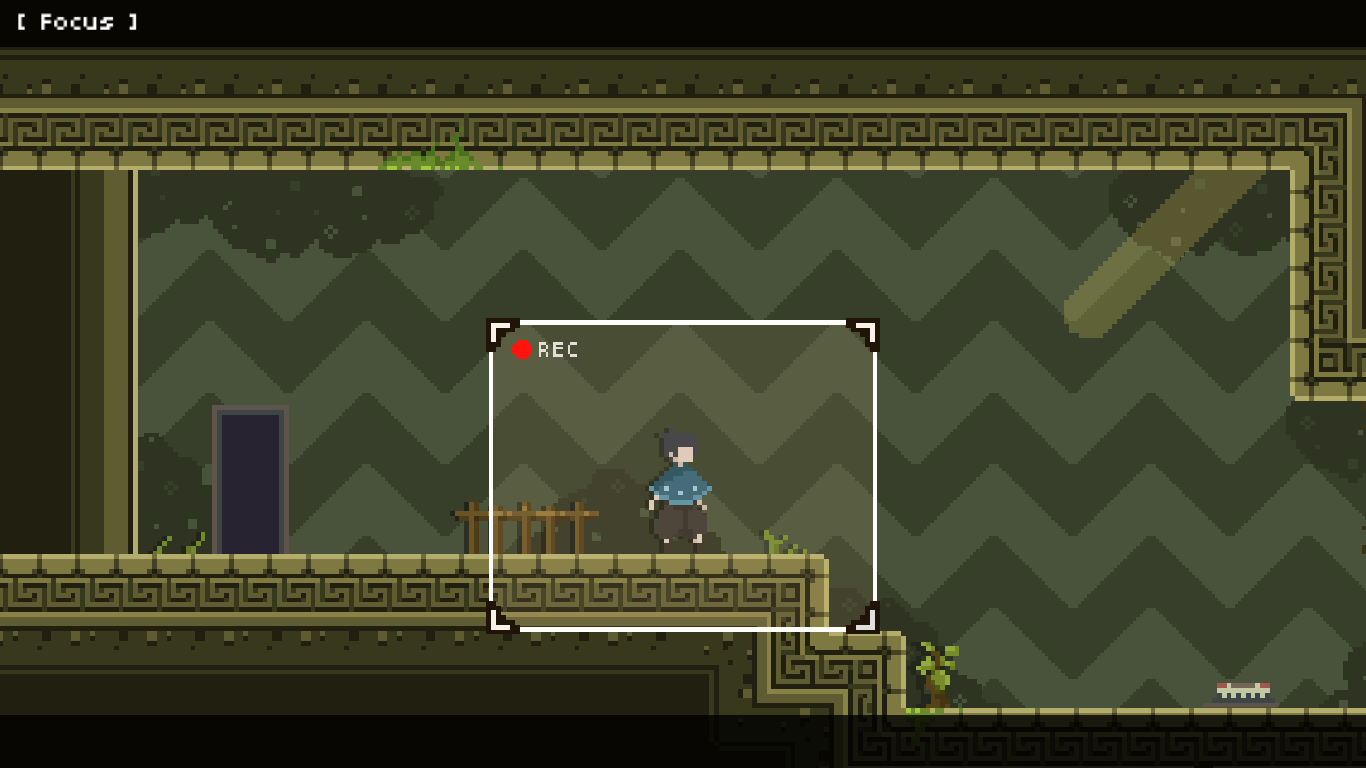
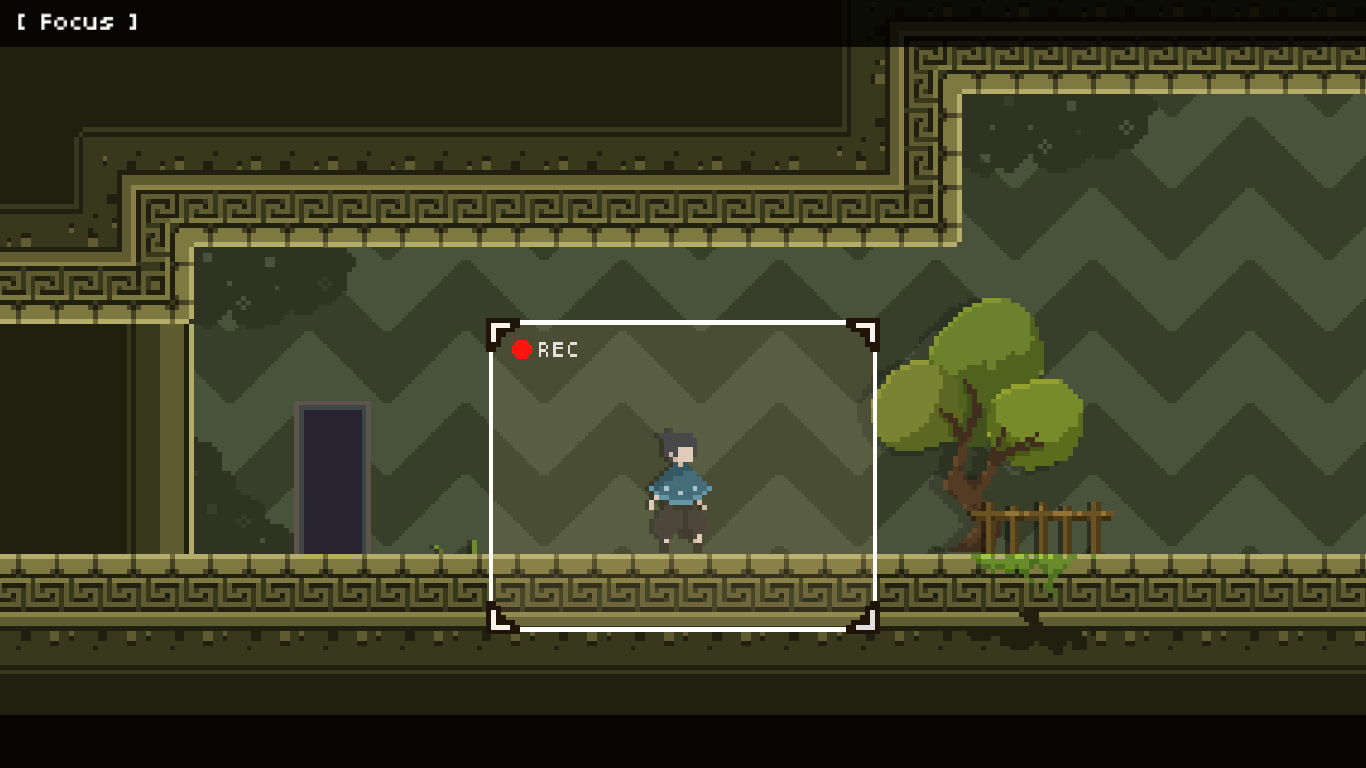
At the moment player use the focus ability, the camera will freeze limit how much player will see the level.
With this design choice, some of the game puzzle cannot be solve without this screen ratio.
These are the things that I implement as a part of the camera system.
Camera Follow
This use mainly by a player controller but also by the game cinematic to make a camera focus and follow the target.
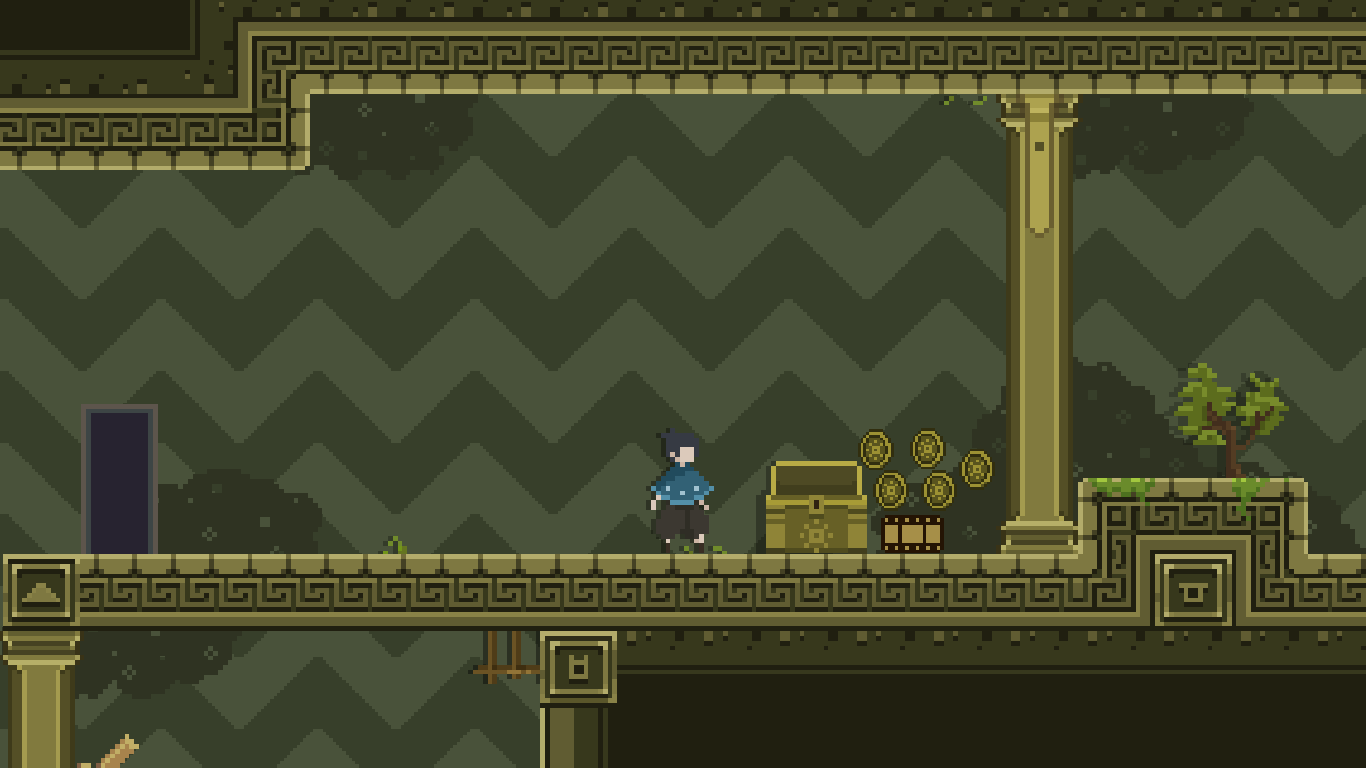
It has an offset setting, mainly use to shift the camera upward to avoid too much wasted space of the screen when trying to focus on the player but didn’t want the player to see much of the ground sprite.
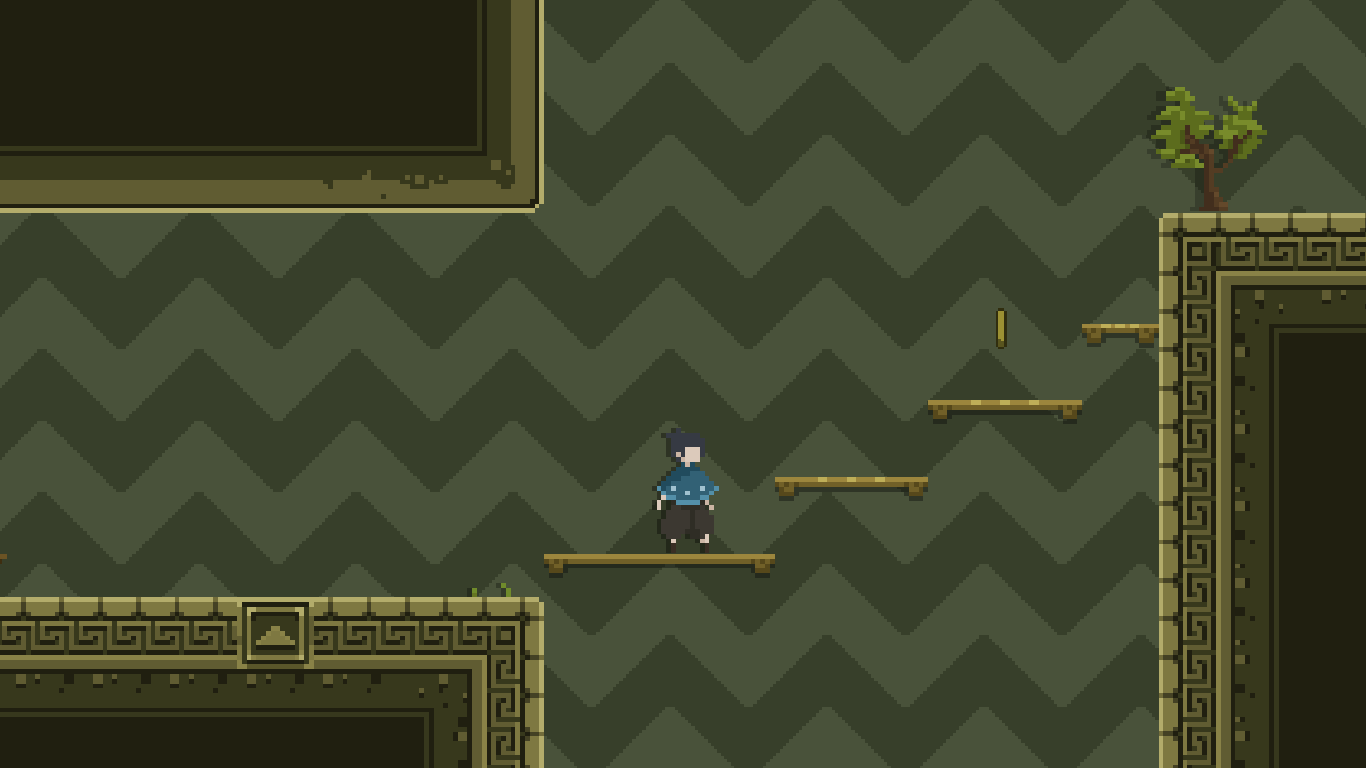
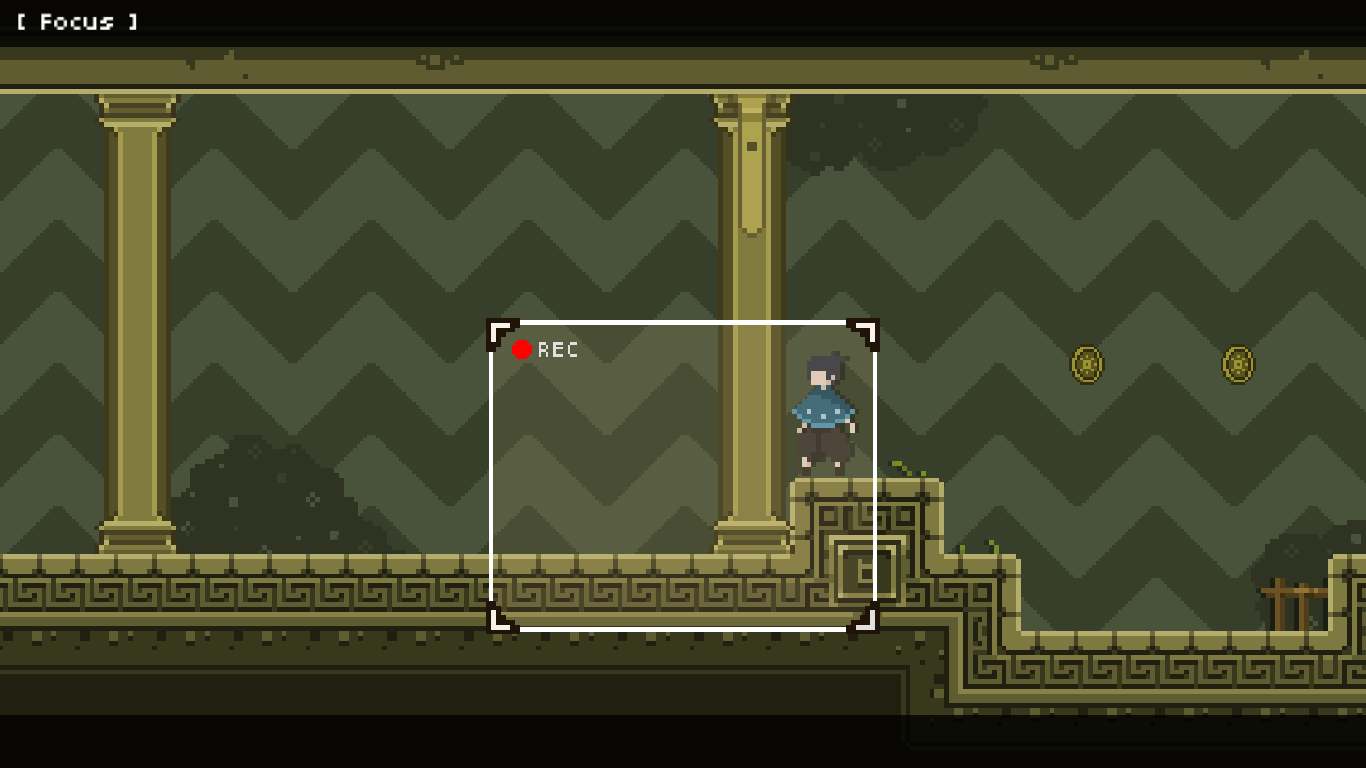
By combine offset setting with a camera trigger, it can be use to avoid a blind jump by shifting the camera to the appropriate offset within the given situation.
Blind Jump is a situation where player don’t know where their character is gonna land if they starting to jump.
As a platformer, it’s best to avoid this situation at all cost.
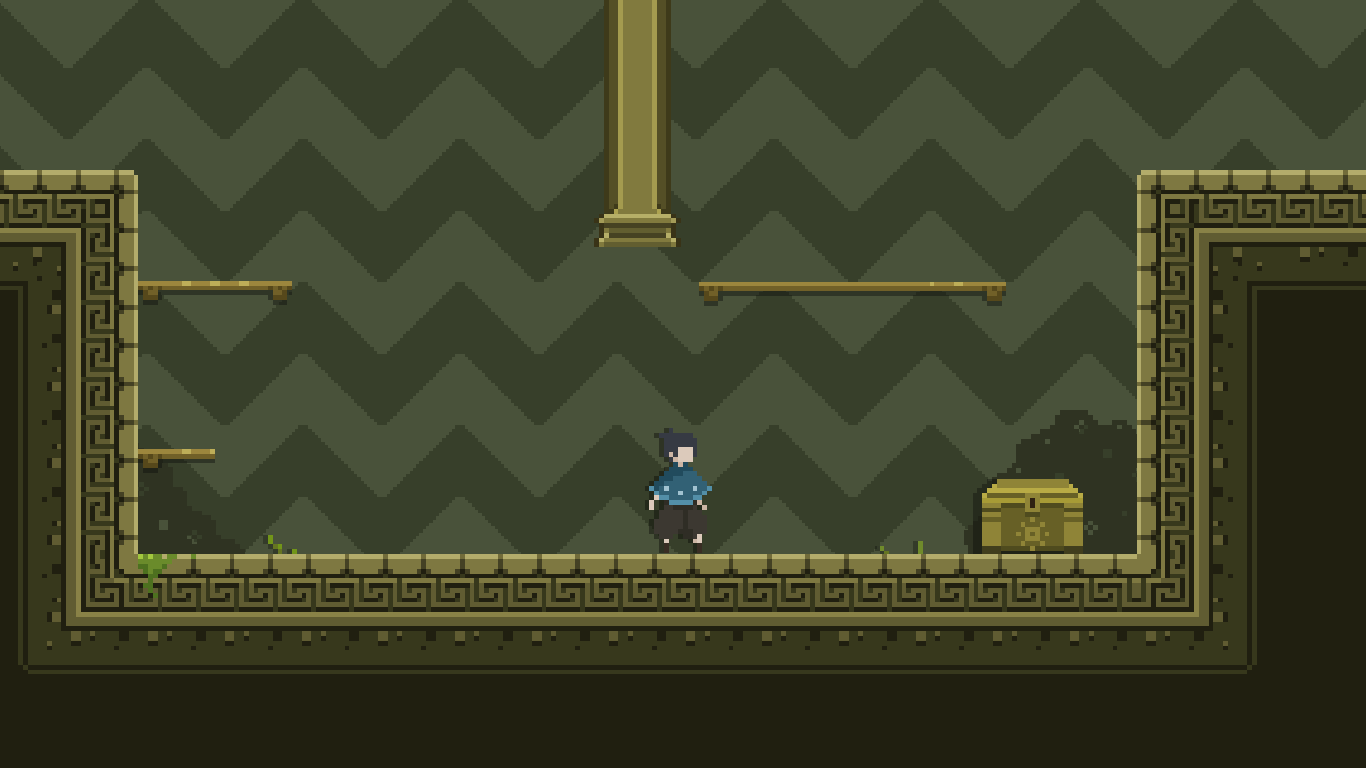
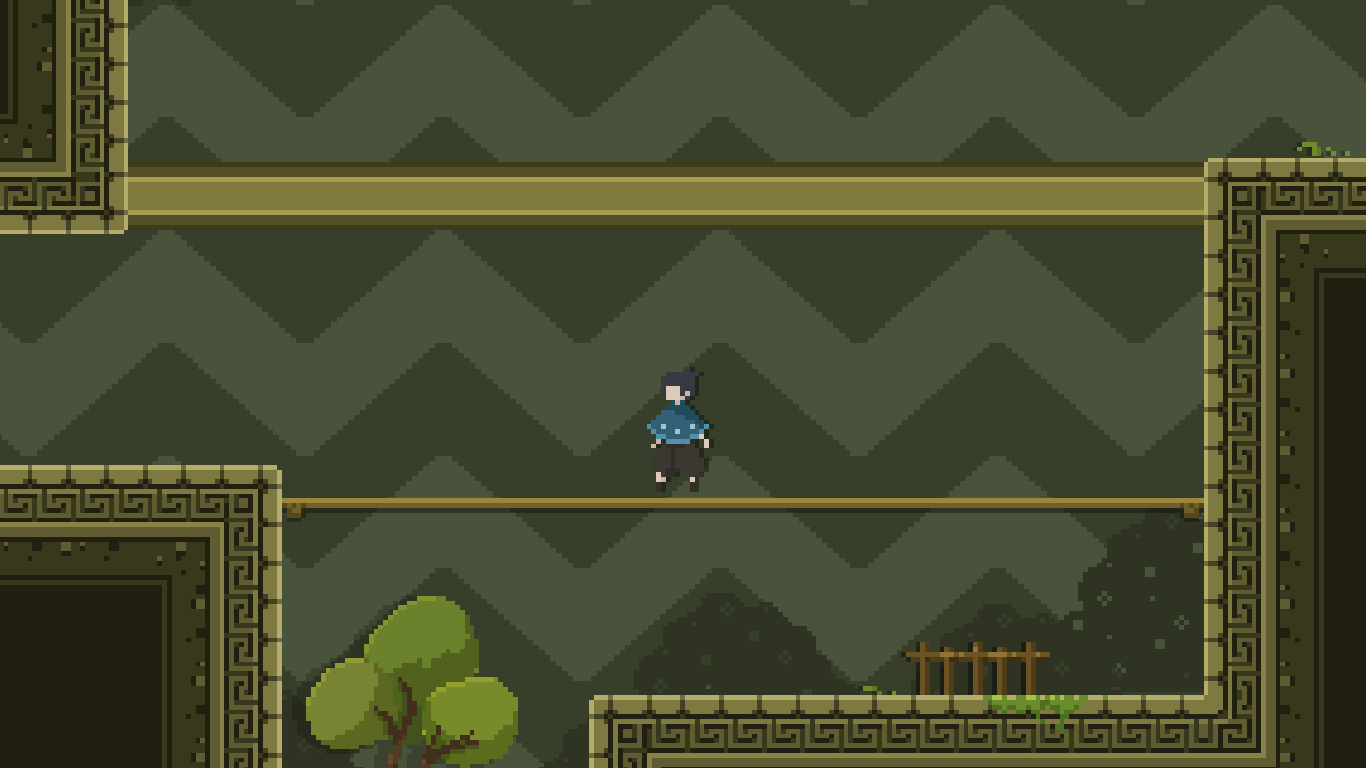
Take a look at this image.
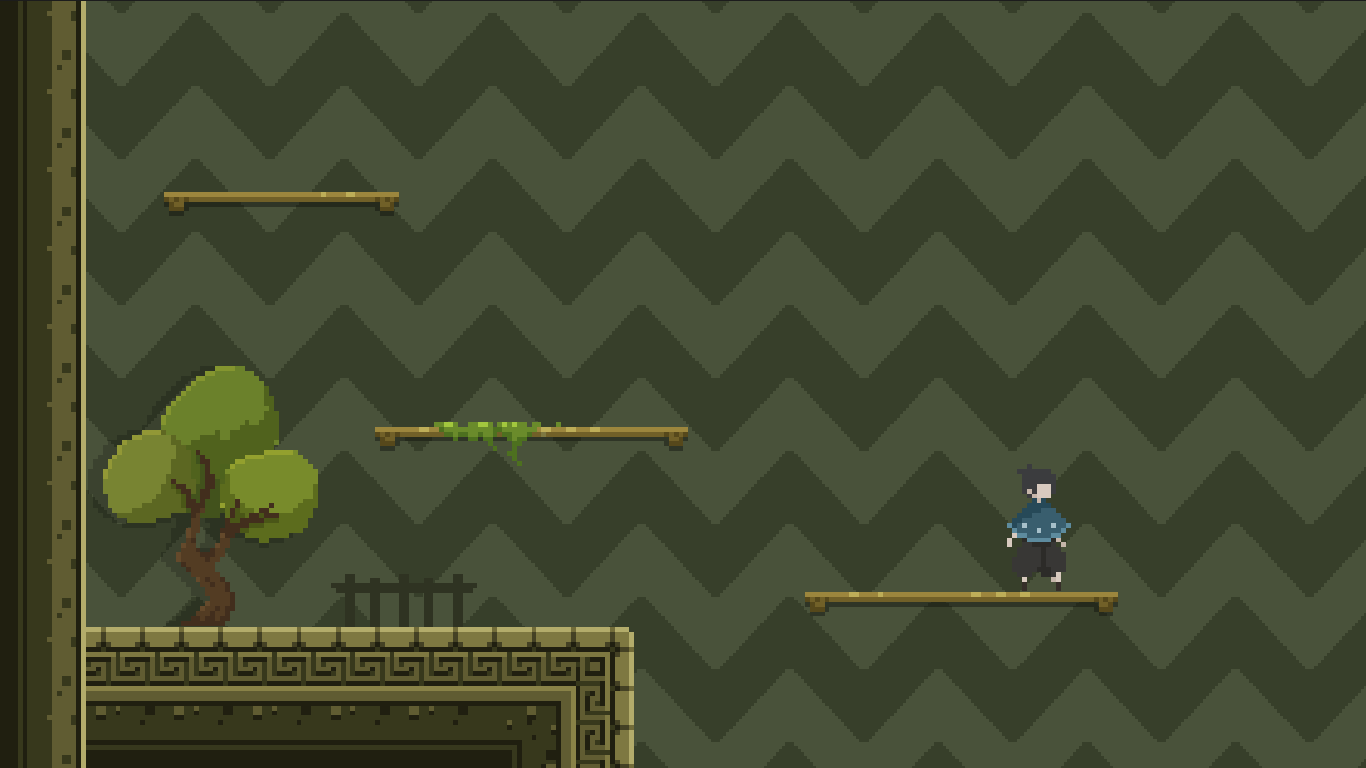
How player gonna know where their character is gonna land if they initiate the jump to the right?
Camera Trigger
This use to change the camera setting and trigger the game cinematic when player enter the trigger area.
The area is draw by Gizmos using a blue rectangle to represent the trigger area.
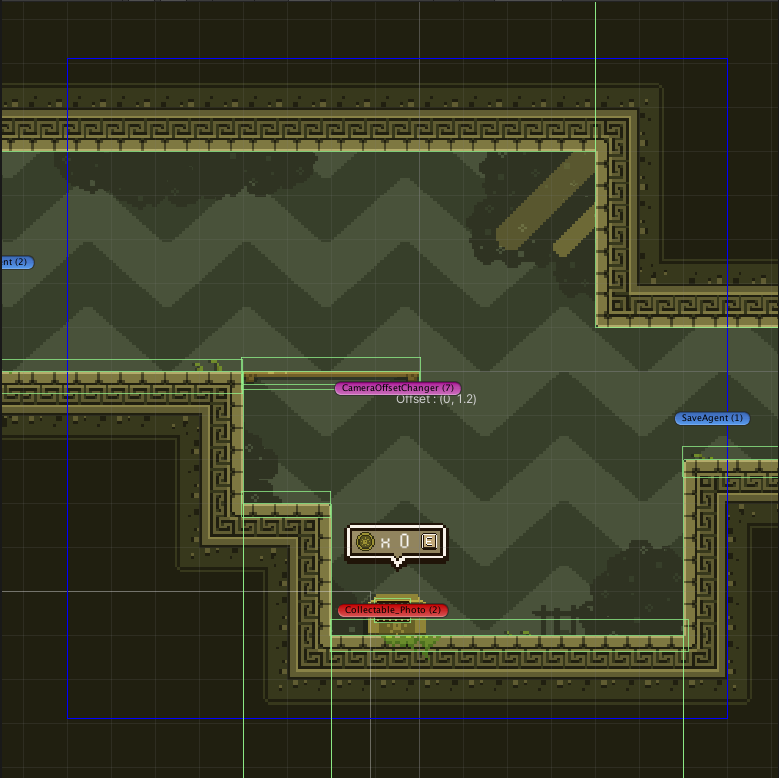
I have to make it this large, because player can bypass a small area by using a focus ability.
Game Cinematic
This is a part of the camera system.
At that time, the Unity Timeline tools which is suppose to help making a game cinematic easier is still in alpha.
I play around with this tools a little bit and it sad to say that this tools is not gonna work at the time we develop this game.
I kinda want to implement just a necessary feature like the thing in the Unity Timeline to help our life easier but we don’t have a time to actually pull this off.
So, I decide to just stick with a simple cinematic possible. Something like, just make a camera focusing on some target.
This allow me to re-use our camera stuff like for example a Camera Follow.
And other stuff that require a logic to work other than a camera in the game cinematic, I’ll just code it specifically for that scene.
And it works perfectly, I don’t have to spend too much time on a game cinematic and have an extra time to do something else.
World Wrapping Mechanic (Focus)
This one is the most challenge things to implement in this project, took me sometime to figure out.
The actual world wrapping logic is not really that hard, but the hard thing is to come up with a general case for the ability itself.
Because it shouldn’t need to have a special case for a particular level.
Anyone that responsible for placing a level itself shouldn’t have to place some magic trigger at a specific place in the level to actually make this works.
It should just work consistently with any level that we throw at it.
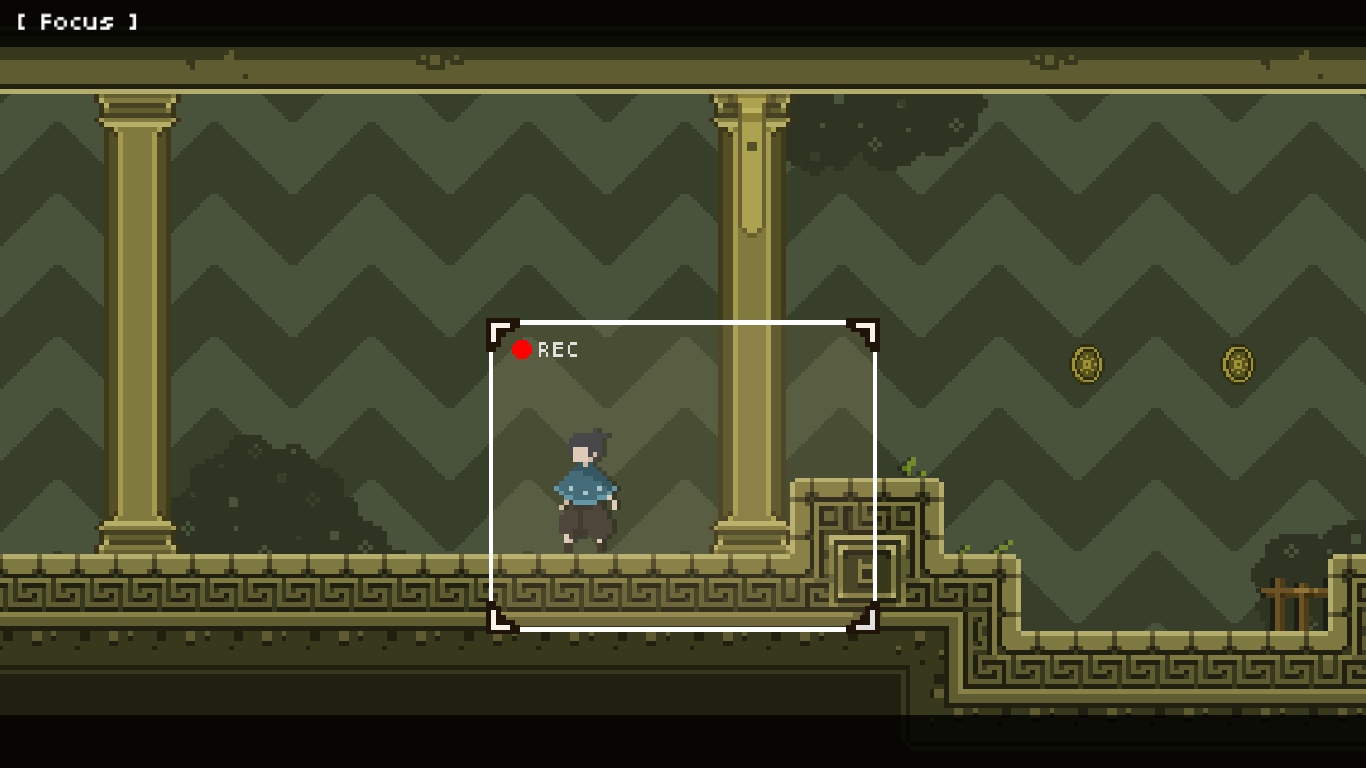
Let’s start with a basic of this ability, the focus (normal mode).
Normal Mode
The focus ability as a text is simple, It’ll wrap player back to the opposite side of where they came from.
But what it actually mean to wrap themself back?
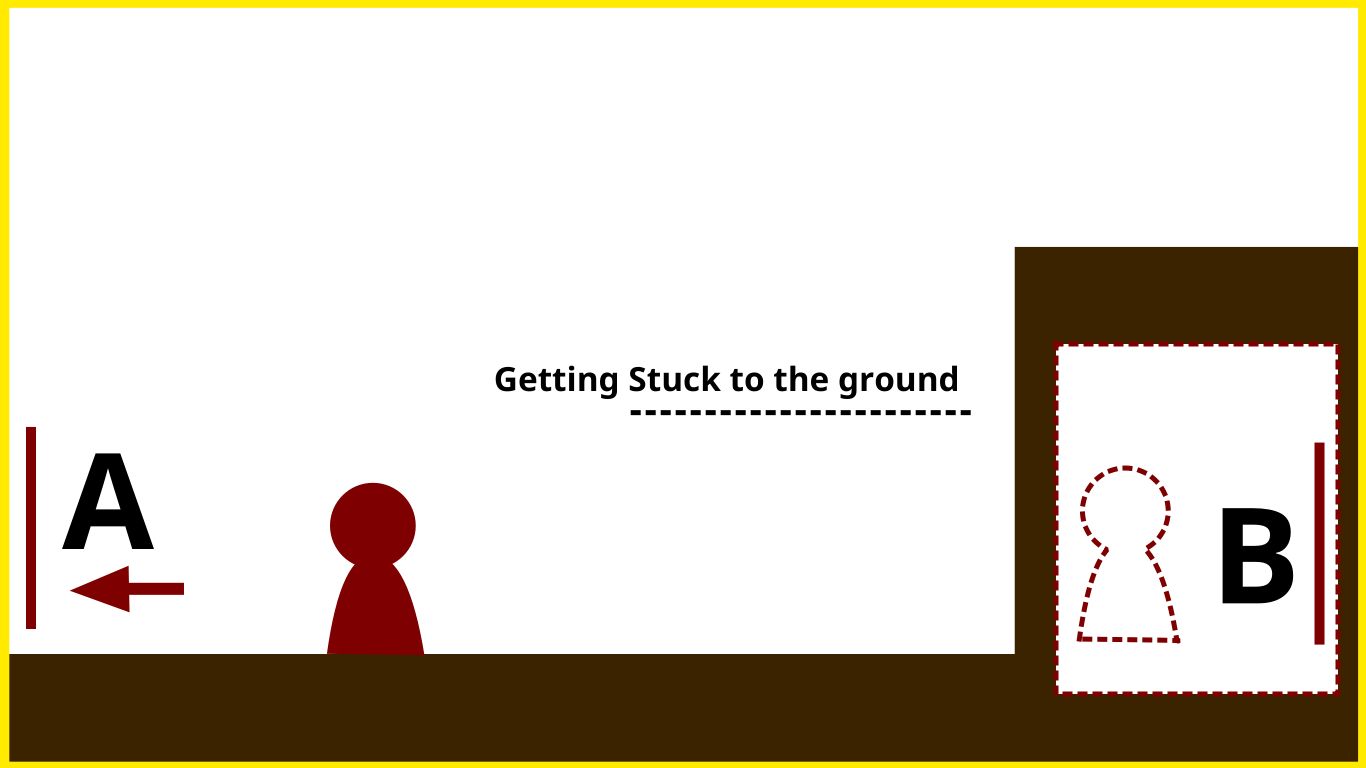
Take a look at this situation.
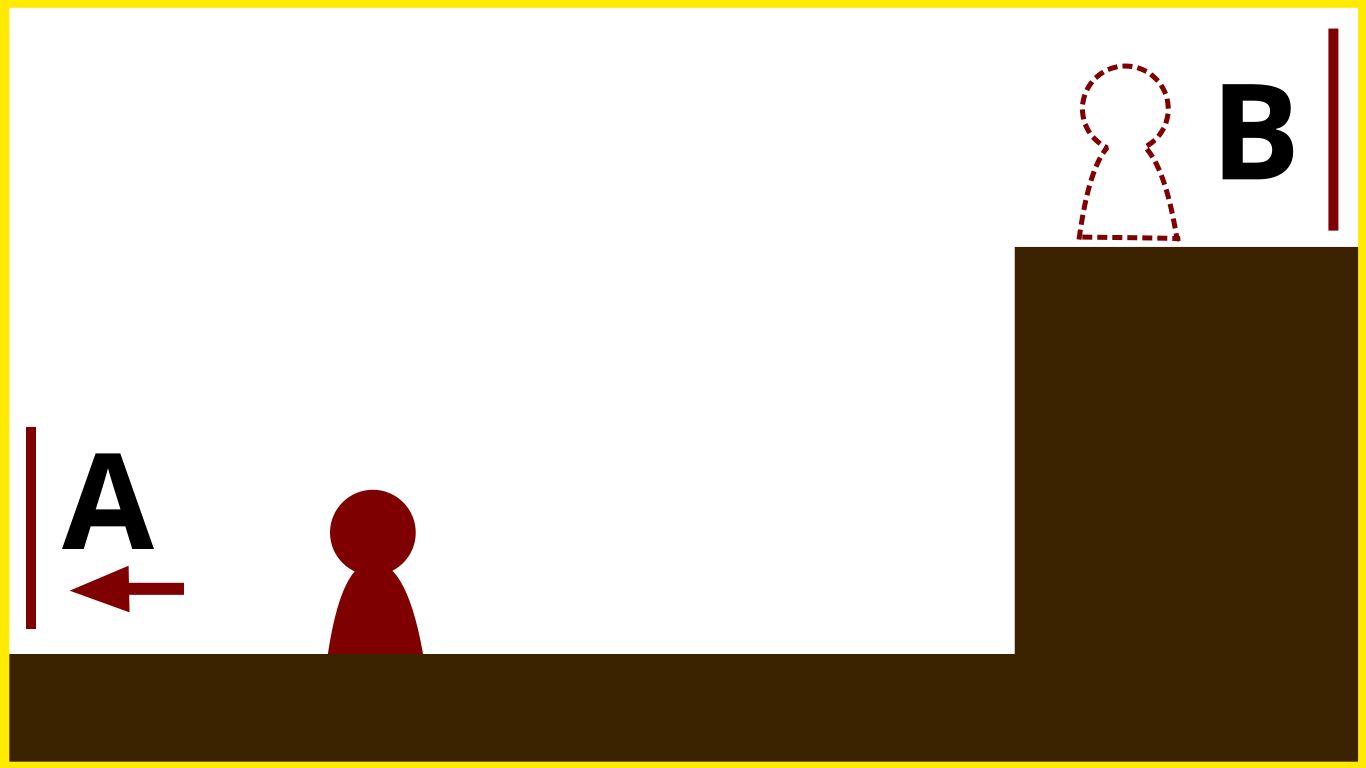
Assume the focus ability frame is cover the entire screen. If player going to point A, do they wrap themself back to point B?
If they wrap themself back to point B, then how about this normal situation?
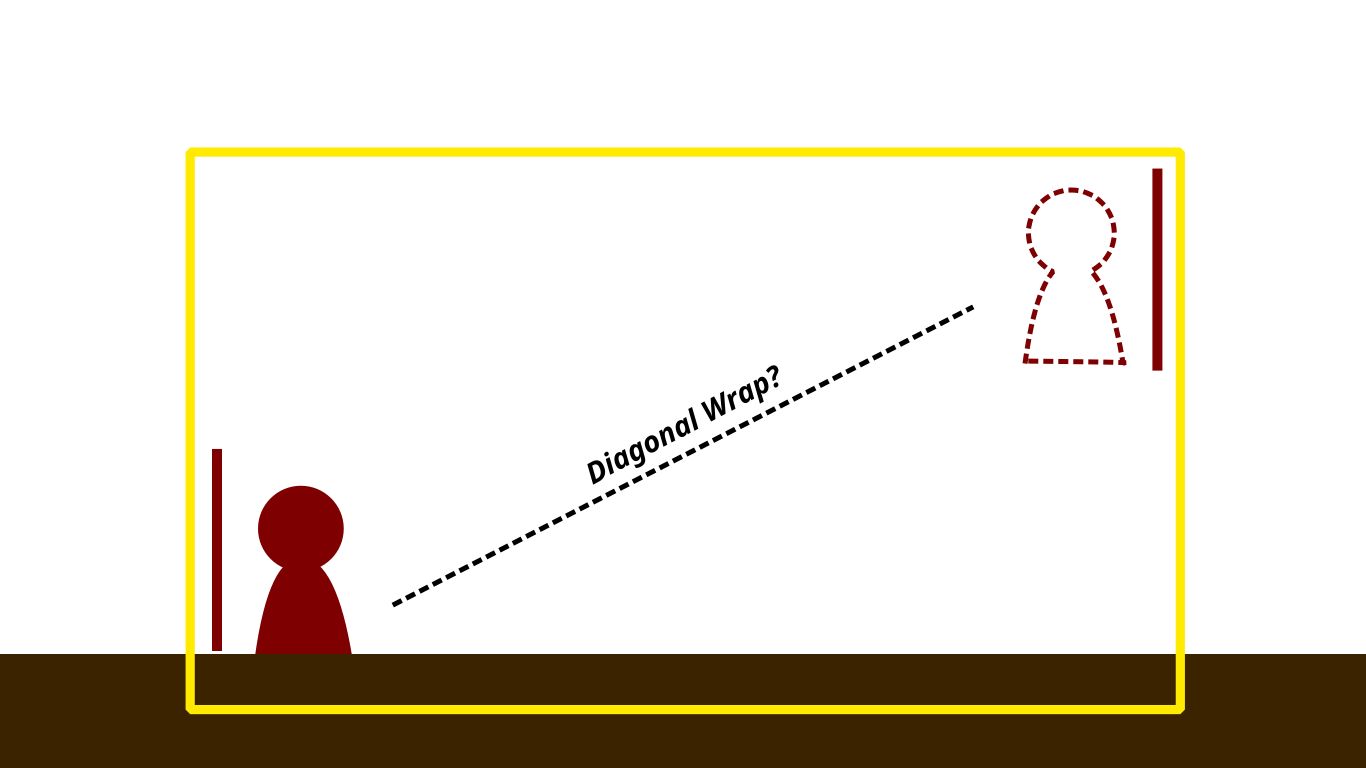
If those assumption is correct, then does it mean the wrapping mechanic wrap player diagonally?
In the player perspective, this looks weird.
What player expect in this normal situation is to wrap themself horizontally.
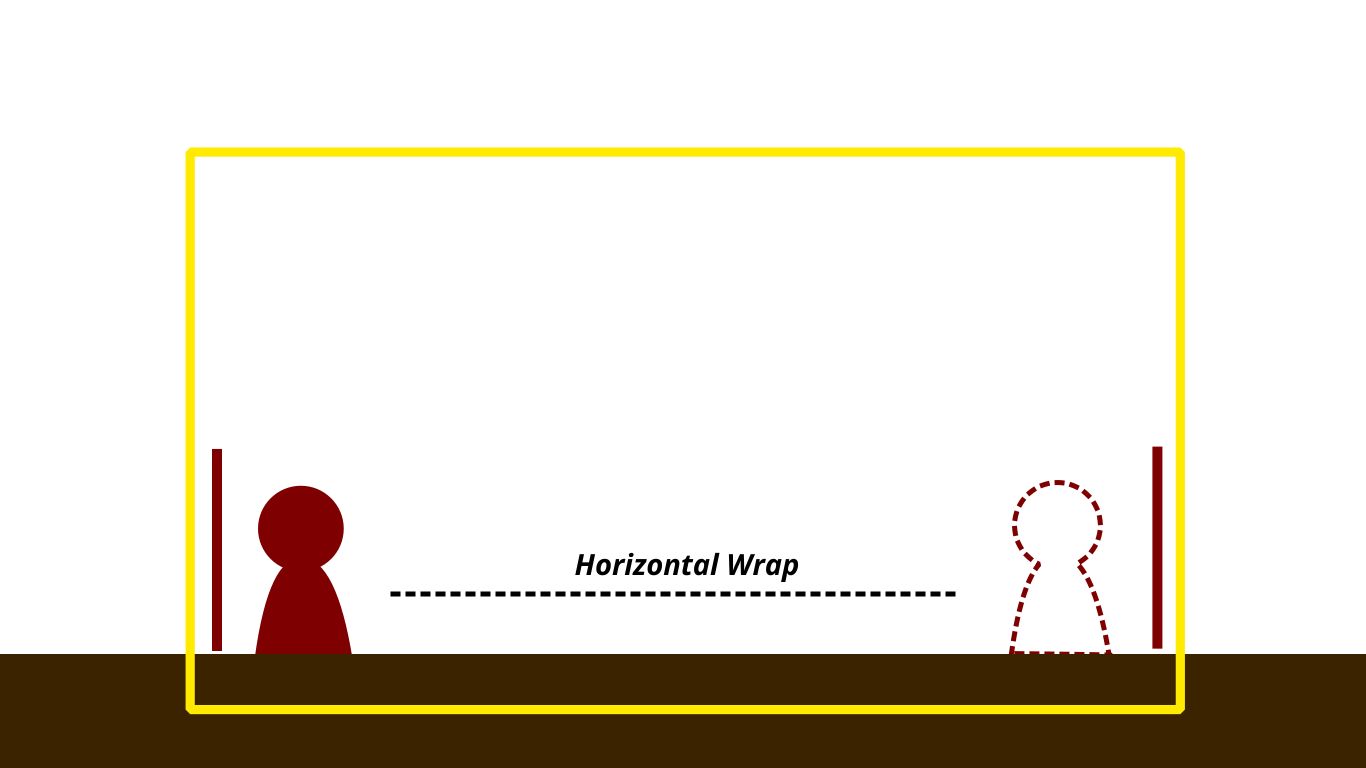
If I want to make the normal case to work as aspect, I have to think about the general case that will explain these two situation perfectly.
And that general case is what I call the “Absolute Wrapping”
Absolute Wrapping is an approach to look at this problem by taking the strong stand on the world wrapping.
The idea is simple.
If there is an empty space that player can fit through, player can wrap themself back regardless of the starting position of the player.
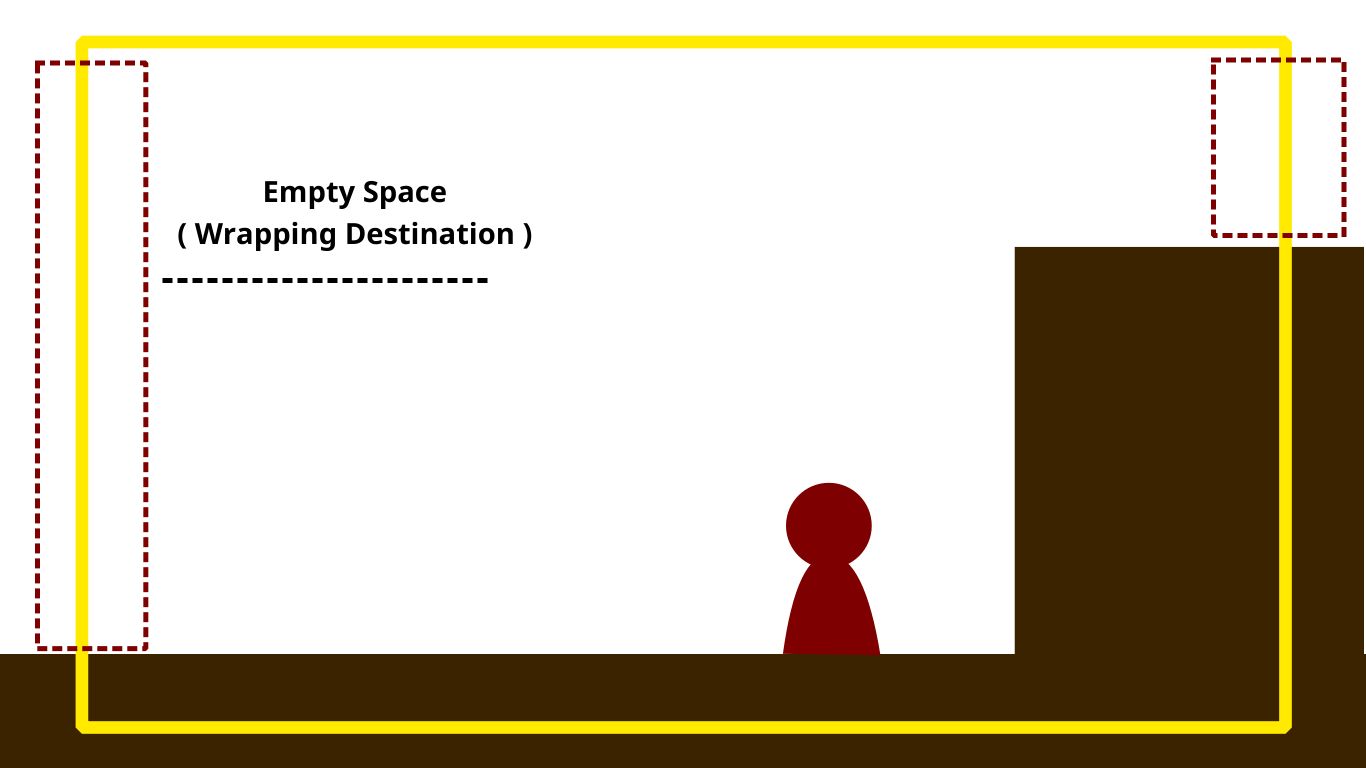
For example. As long as there is an empty space, player can go to the opposite side in which the player start position’s height don’t have to be the same height after finish wrapping.
But there is an issue with this approach.
Not the technical stuff, but the design decision.
If I implement this in the Absolute Wrapping way, It’s kinda broke the level. (Gating problem)
This mechanic will be too powerful and can bypass any obstacle with ease.
By making this ability too powerful, I accidentally downgrade this ability to be use as a gimmick.
I want player to rely on the focus ability as the key to solve the puzzle.
If this ability is not only easy to use but also make player not to think about the puzzle at all while activating this, It’s kinda defeat the purpose of this game.
Imagine you develop a game about lock picking.
And from the start instead of giving player the lock picking tools, You give player the master key to unlock anything. (What’s the point of the lock picking then?)
But there is still a hope.
There is other way to think about the world wrapping.
KISS Wrapping or keep it simple (stupid) wrapping is the simpler way to world wrapping in which it will only wrap player per axis at a time.
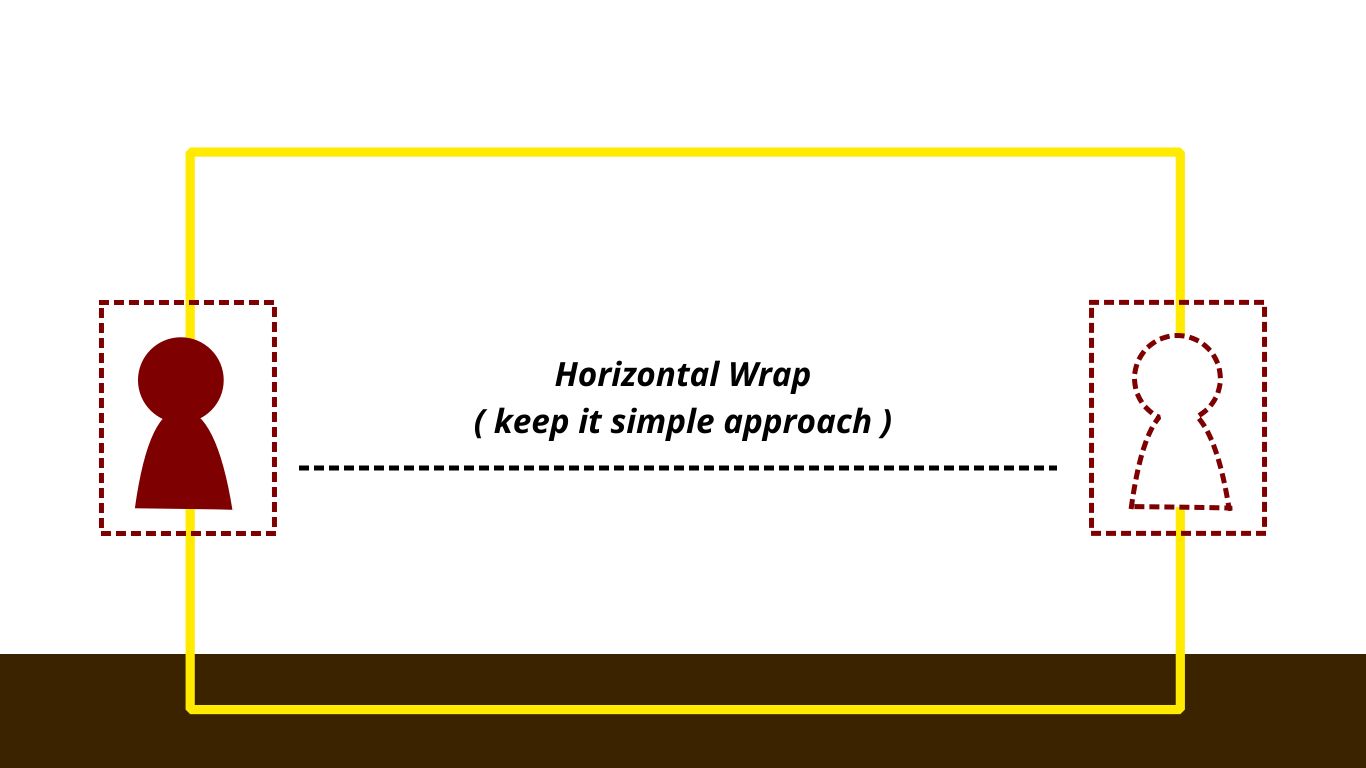
For example. If player come from the left side, It will wrap player to the right side.
But instead of looking for any potential empty space, the left and right is clearly the horizontal axis.
So, It’s gonna wrap player only x axis and keep the y axis as the same value before wrapping.
This mean player cannot wrap themself to the other side when their height is not the same as the wrapping destination.
The same thing also apply when player wrapping vertically.
If player come from the lower side, it’s gonna wrap player to the upper side while keeping the x axis value.
With this nerf, the gating problem is easier to solve. Allow us to make some interesting obstacle.
But this approach also have its own set of problem, I cannot blindly wrap player.
Because if I do, player will get stuck in other collider. Like a wall or a ground in player perspective.
So, I have to come up with a way to check if the wrapping destination is safe before beginning to wrap player.
Now, let’s dive into the implementation detail to see how it’s done.
Wrapping Character Back
Assume the wrapping destination is safe.
When half of character reach the edge of the focus frame, I’ll set character a new position to the opposite side depending on the side of the focus that character enter.
It’s like character just do a teleportation.
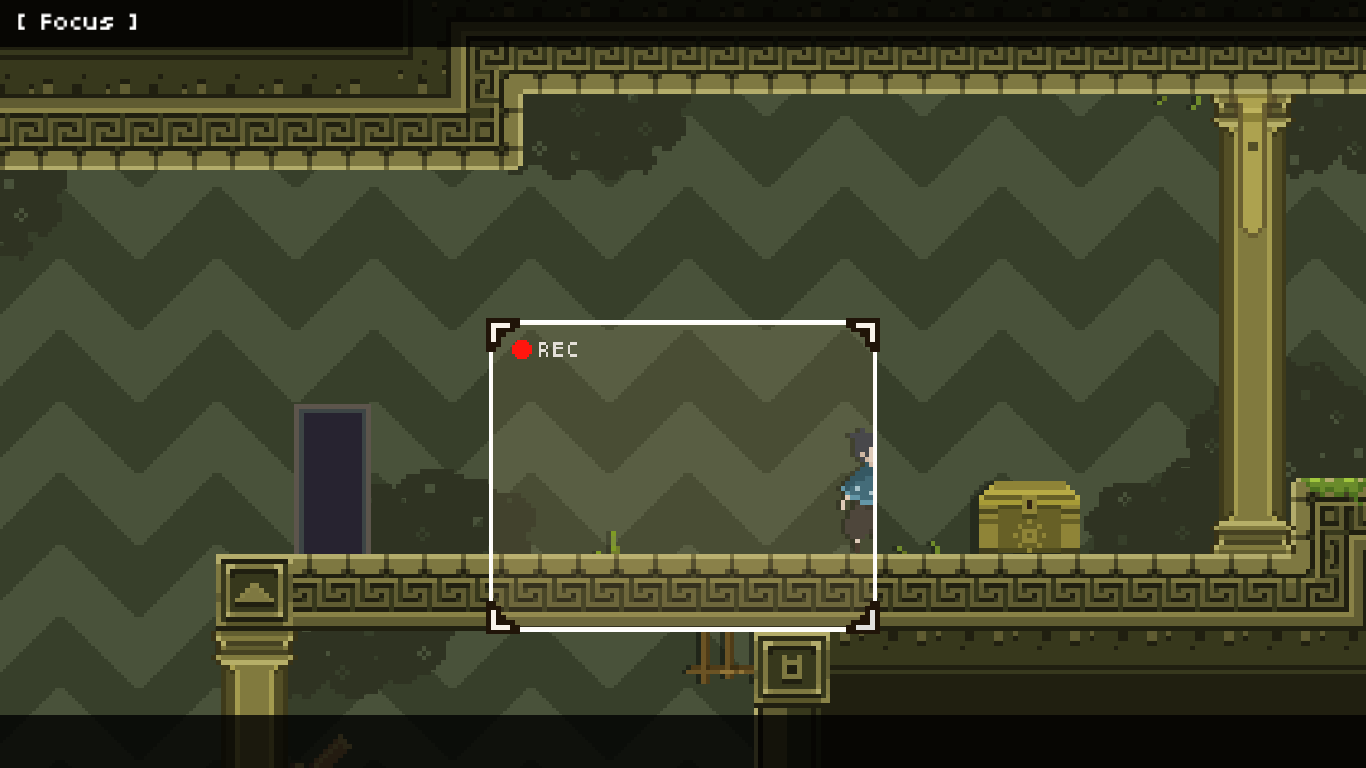
The actual frame size of focus is store using the world coordinate position and its size (width, height).
To mask character within the frame, I use the built in Sprite Mask.
The sprite of mask itself is just a one unit sprite that scale its size to match the focus frame size at runtime.
The solid frame is a built in Unity Line Renderer.
And a necessary focus frame decoration at the edge of this frame is just a sprite that place at runtime by finding an edge world coordinate from the format that focus frame use.
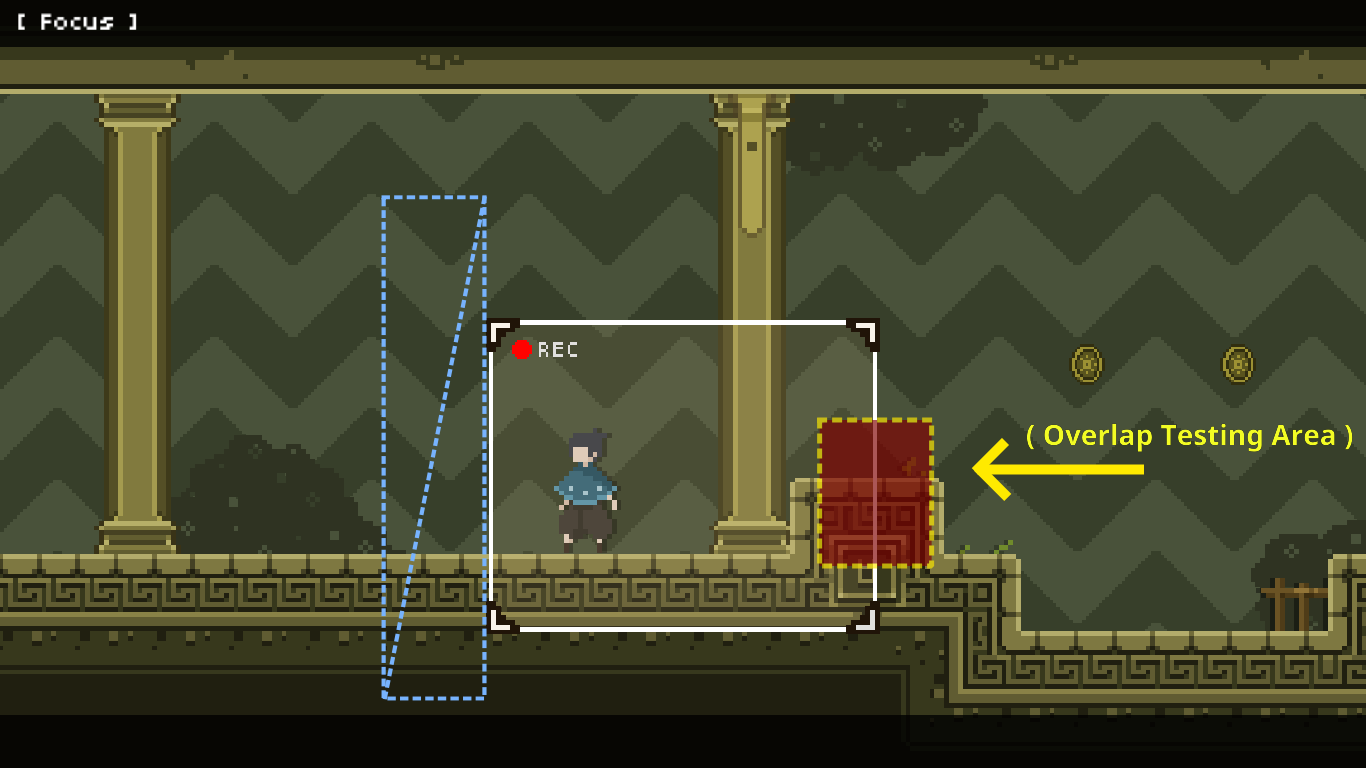
Limit Wrapping Capability
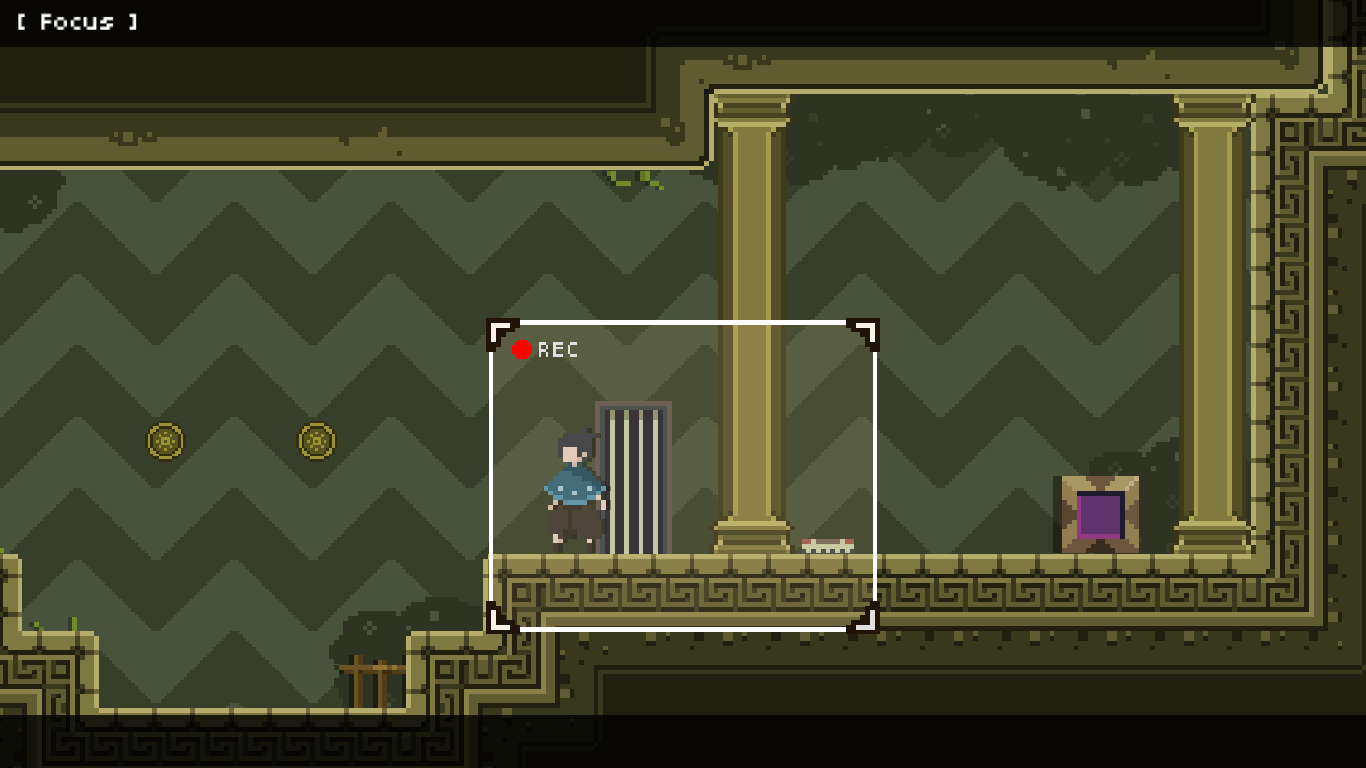
There is a situation where character won’t be safe to go to the wrapping destination.
In this image, you can see the focus frame itself overlap to the wall on the left.
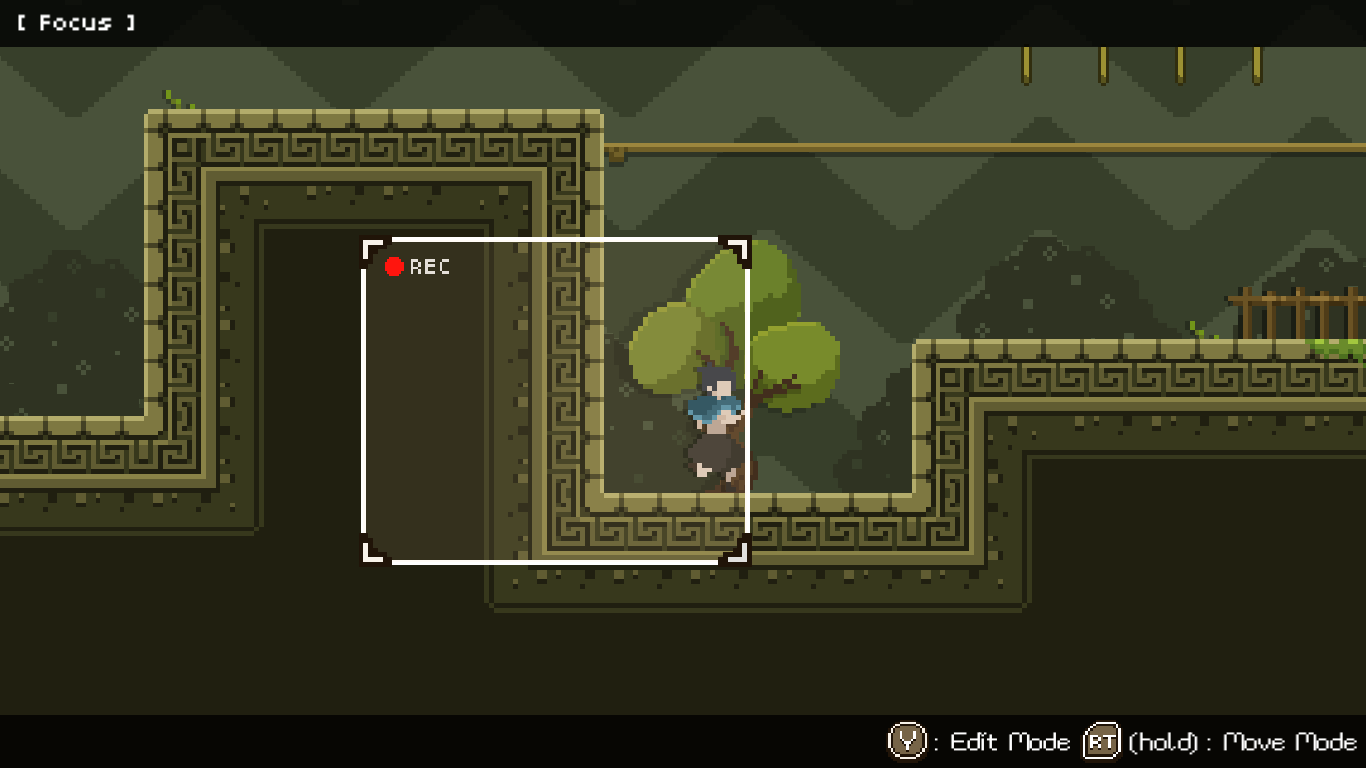
When this happen, there is an invisible wall to prevent character from reaching the edge of the focus frame by a half of character.
I will refer the invisible wall as a blocker.
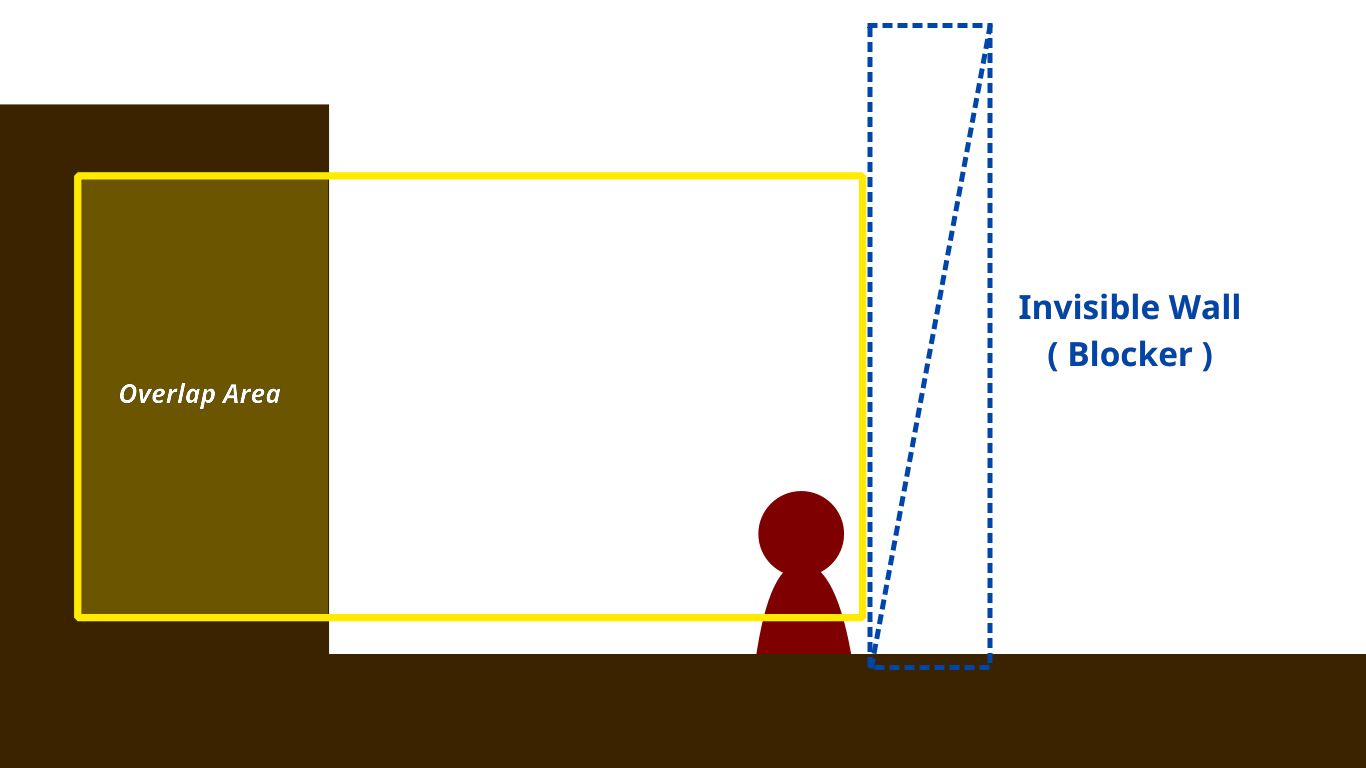
Blocker is just a collider that I control its position during runtime.
Since I use physics engine in Player Controller, I’ll let physics engine handle the collision resolution between player character and the blocker.
In the normal situation, there are blockers on each side of the focus frame.
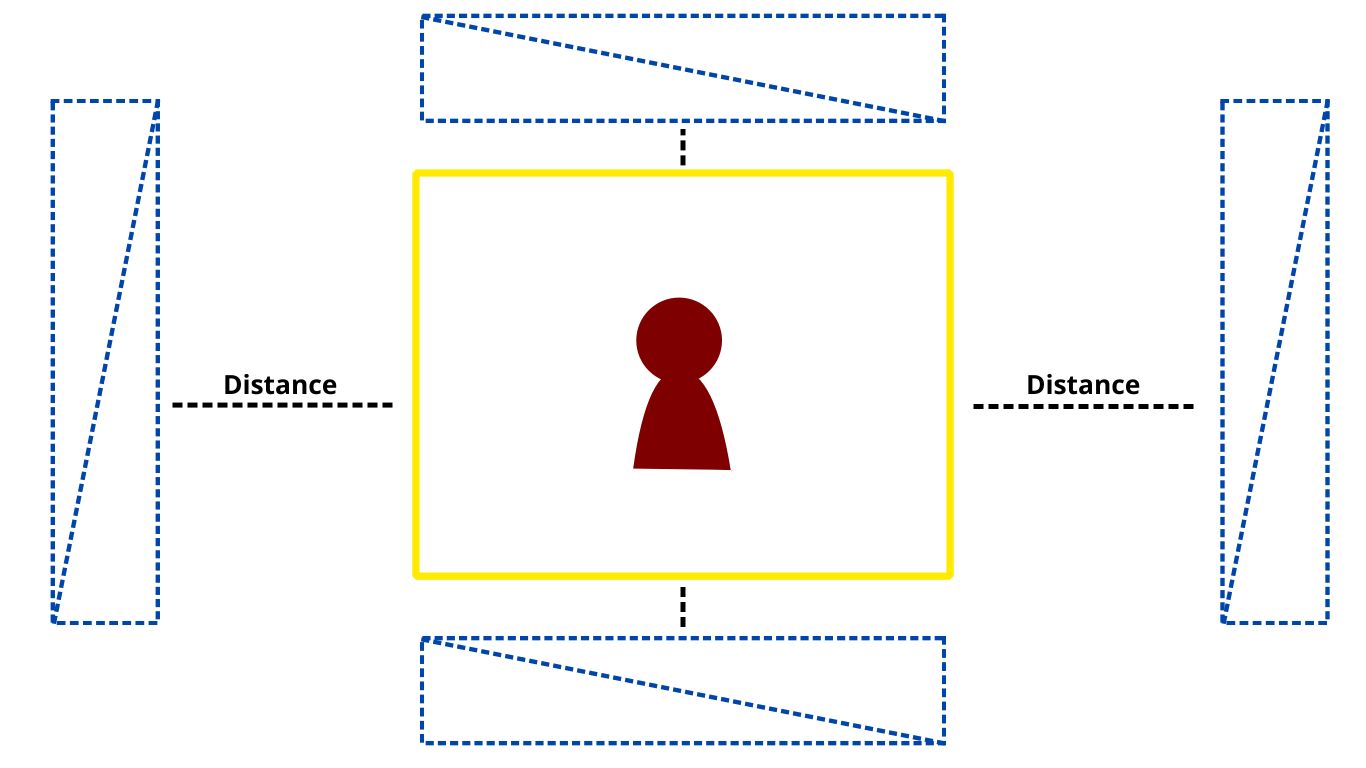
Each blocker will keep its distance away from focus frame to make sure player can do the world wrapping.
To make thing simple, let’s focus on just one blocker.
In order to make sure that player can go to the wrapping destination, I have to make a quick overlap testing to see if there is enough space for this character to wrap.
In this case, character come from the right side.
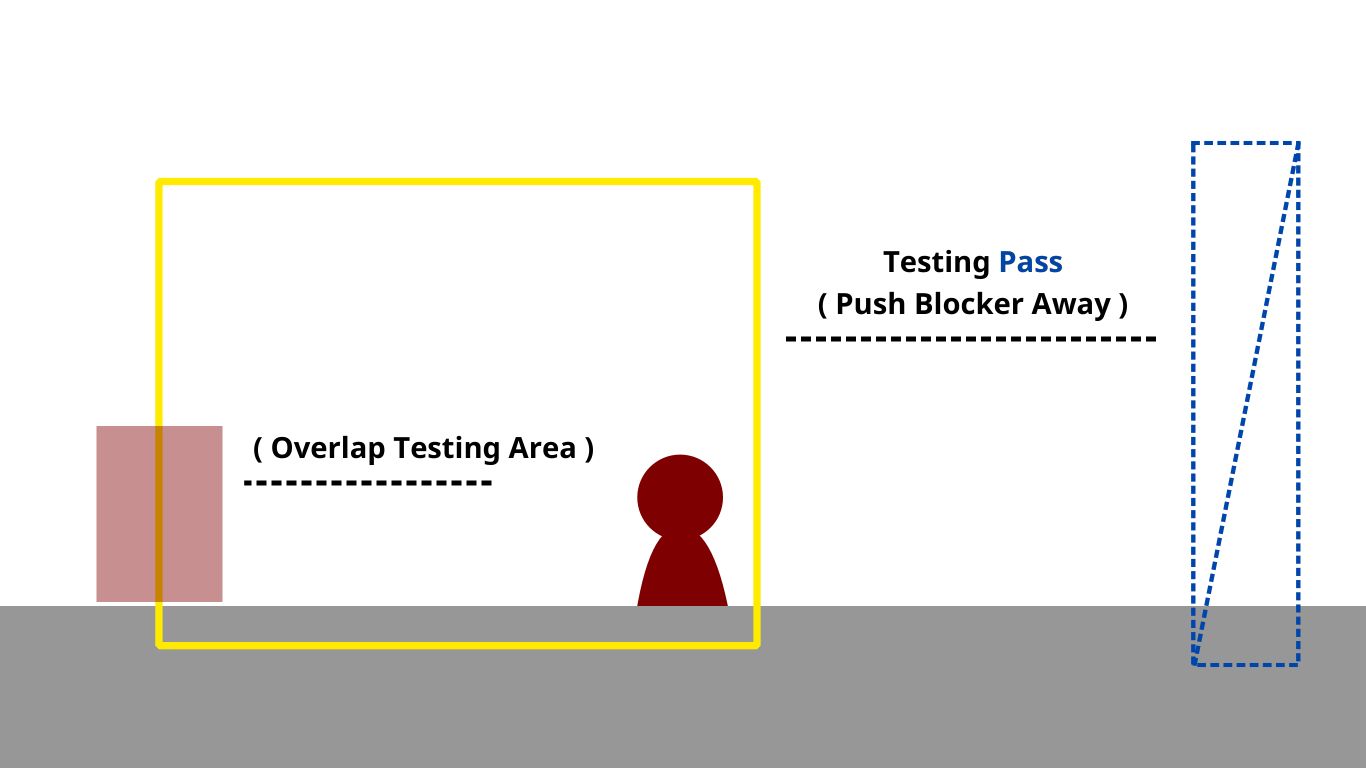
So, I have to overlap testing on the left side which use the same width and height as the character to test other collider.
If the testing pass (no collider overlap to the testing area), I’ll push the blocker away from the focus frame.
But, If the overlap testing fail, I’ll move the blocker as close as the focus frame to block player from moving closer to the edge of the focus.
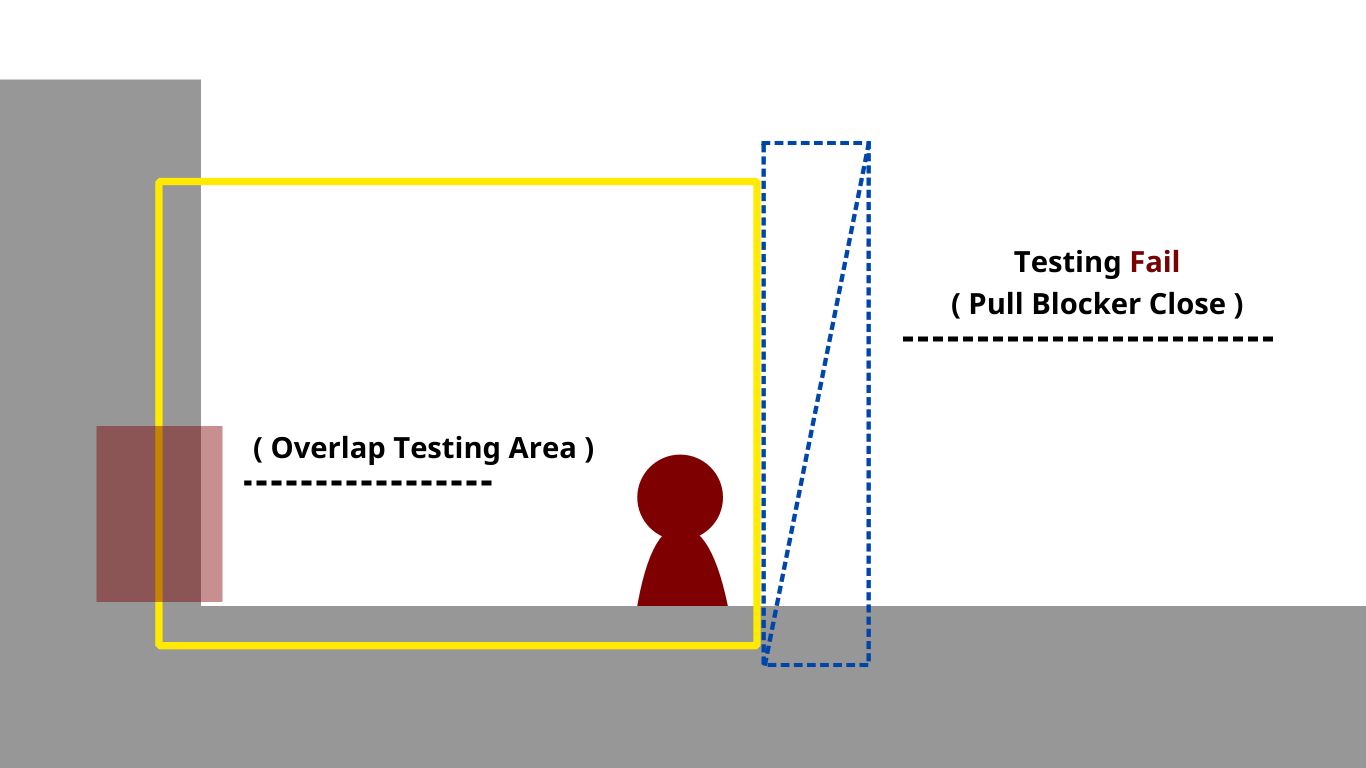
Not all blockers will be move, It’ll pick only the blocker at the opposite side of the wrapping destination.
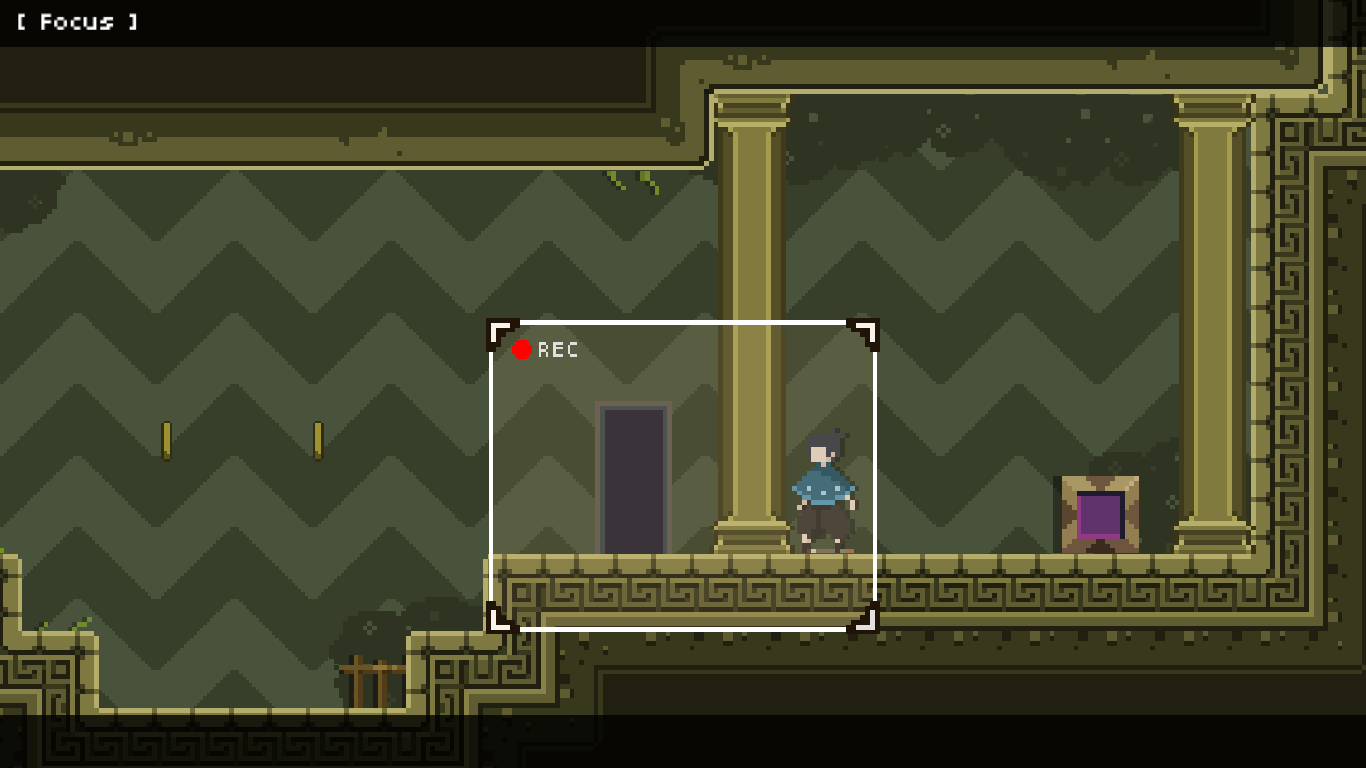
But there is other interesting situation here.
What if there is enough space on the wrapping destination?
If you guess player can freely move to the left side, then you wrong.
Remember that the KISS Wrapping doesn’t care about any potential empty space, It’s care only if player can wrap to the other side.
In this case, the area of overlap testing looks like this.
As you can see, player wrapping horizontally. So, It’s testing area will only care about x axis and keep the y axis.
The result of overlap testing will fail, because it’s overlap with a ground collider at the right side.
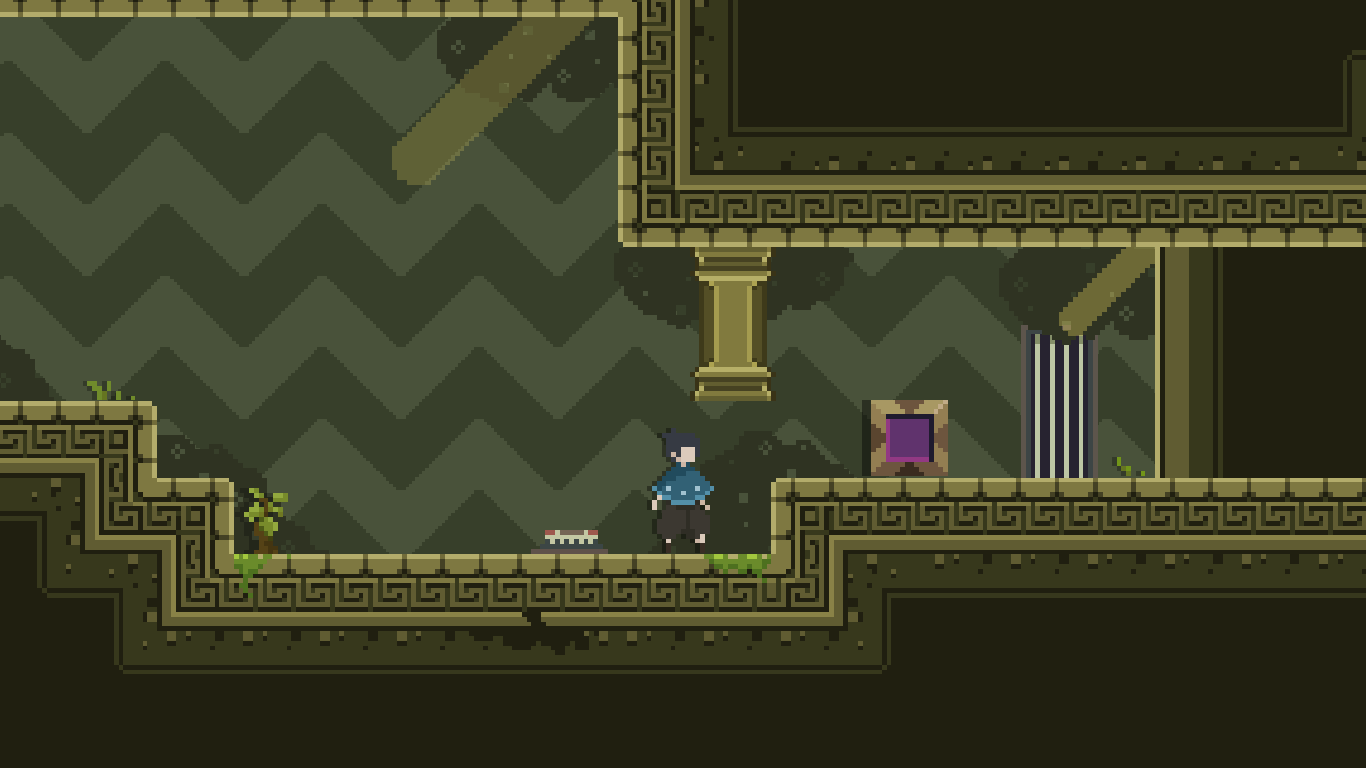
But, What If player position in y axis change?
Now, the overlap testing area looks like this.
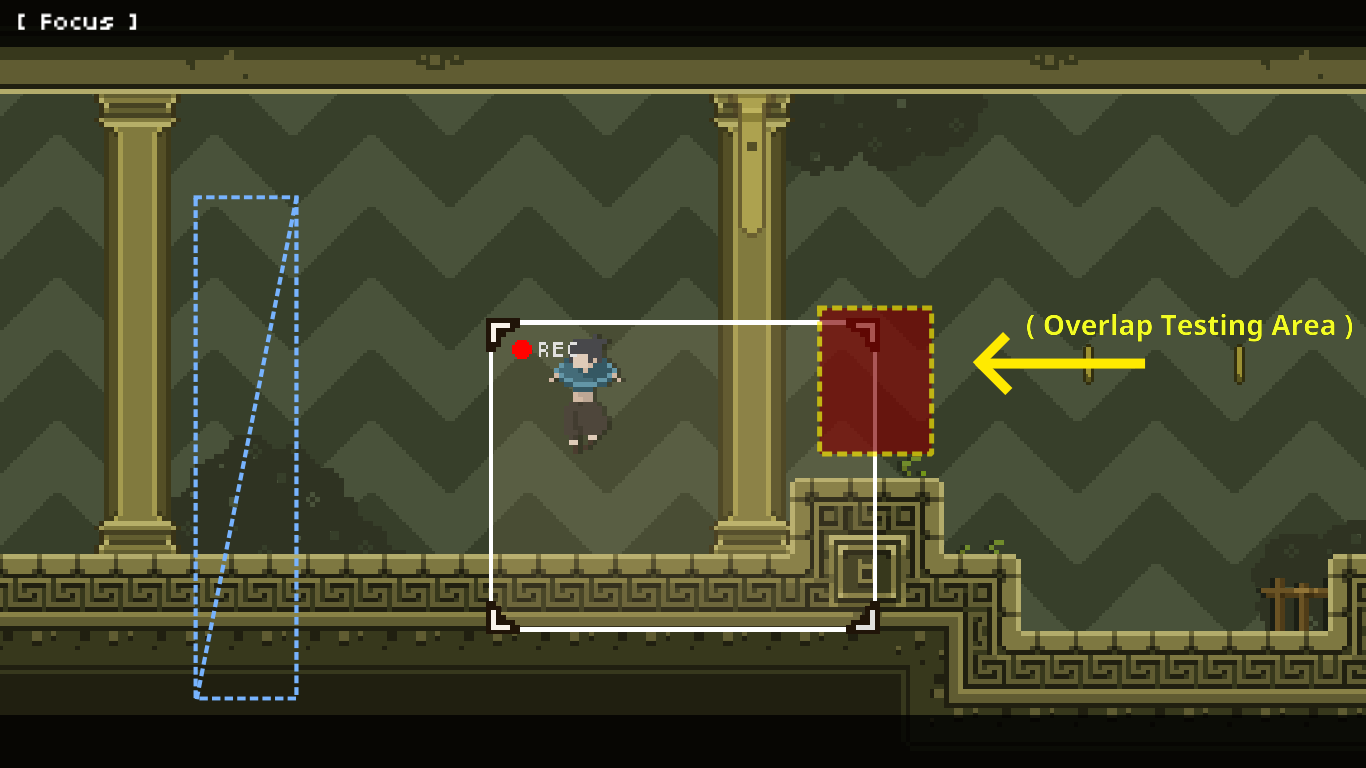
Overlap testing result will pass, this allow player to go to the wrapping destination by jumping to the left side.
This is what it looks like in the Unity Editor.
The blocker will keep jumping back and forth between trying to block player and to not block player.
But, there is a consequence.
The same thing apply to vertical axis.
With this implementation, it allow us to do something like this.
Because player cannot go to the upper side, It’s block player from going to the lower side.
Accidentally, making a convenient ground for player.
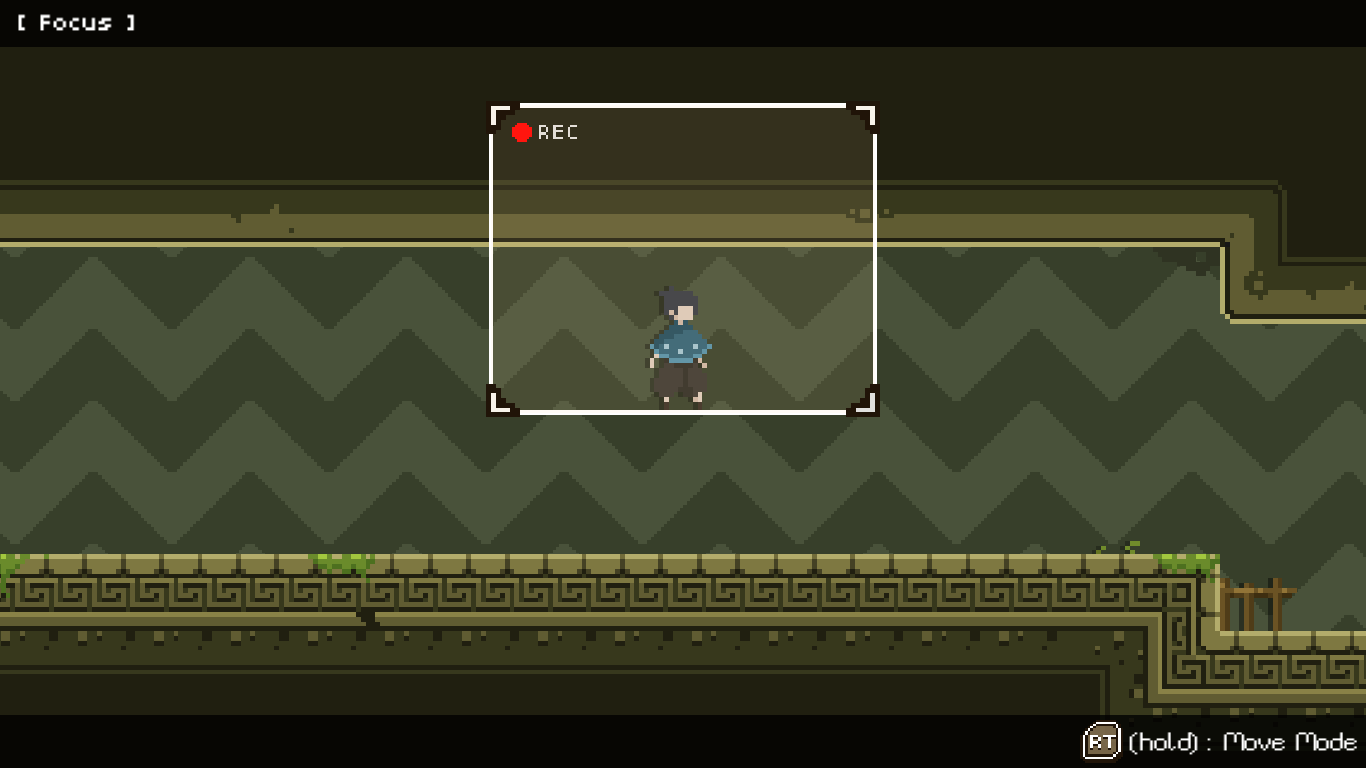
Move Mode
This mode allow player to move the focus frame from its starting position which is the center of the player character.
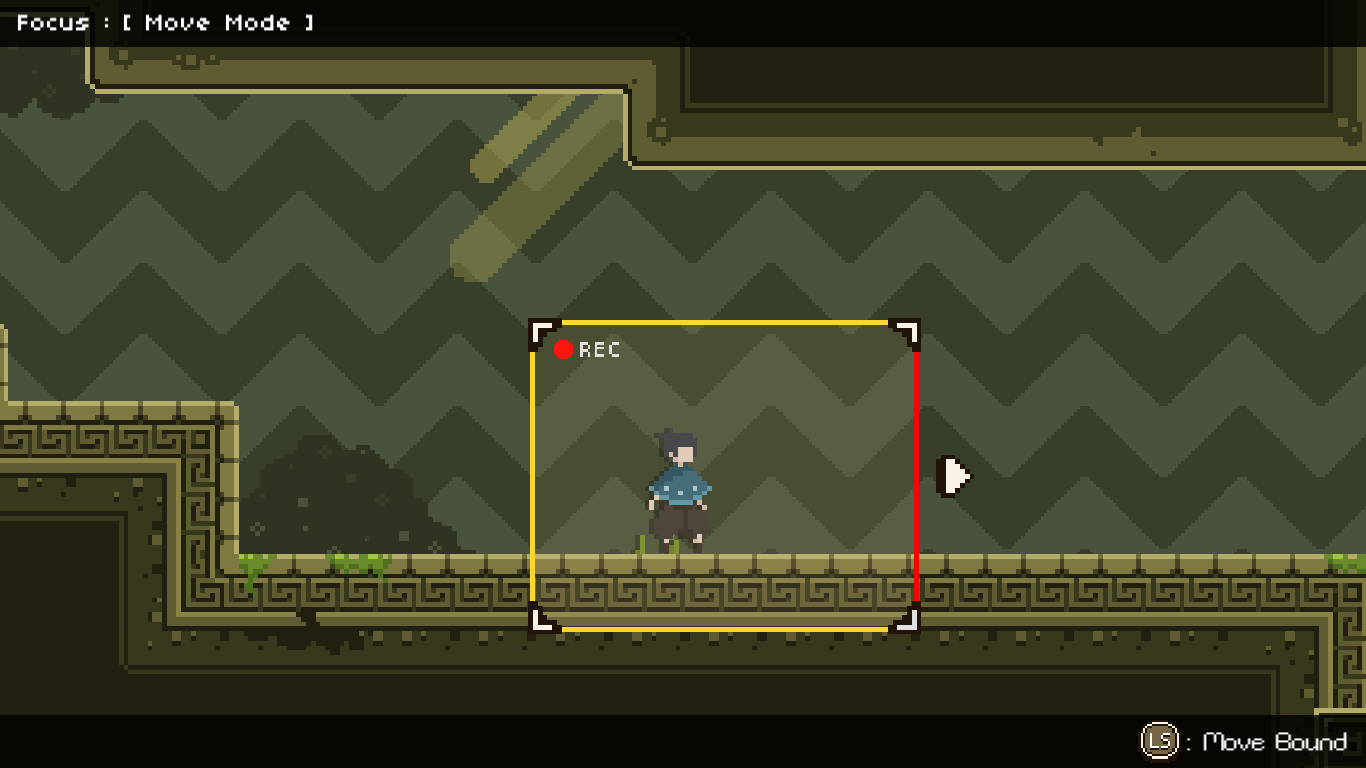
Since I use the same keybinding for player movement as a focus frame movement, I force player to stand still while using this ability. ( That’s why I call this ability “Focus” )
There are limits in this ability.
First, You cannot move its frame further away from the character.
If I allow it to move any further, the character will wrap itself while standing still. It’ll look weird from player perspective kinda like the game is broke or something…
There is also a situation where its frame cannot move when character upper space is not enough.
This help preventing player from stucking to the wall while its frame trying to move up.
All it take is just a quick raycast to see if there is any wall above character.
The whole frame cannot move further away from the screen as well by convert the edge of screen into world point and just do a quick position clamping to the edge of the focus frame.
And the last thing is to not allow player to activate the move mode while player in the mid-air to prevent player from quickly deactivate and activate this mode while in the mid-air which allow player to make a slight change in position of the focus frame because of how world wrapping in vertical axis behave.
This is not intended, feels like a cheap trick when player pull this off.
That’s why I don’t allow this at all.
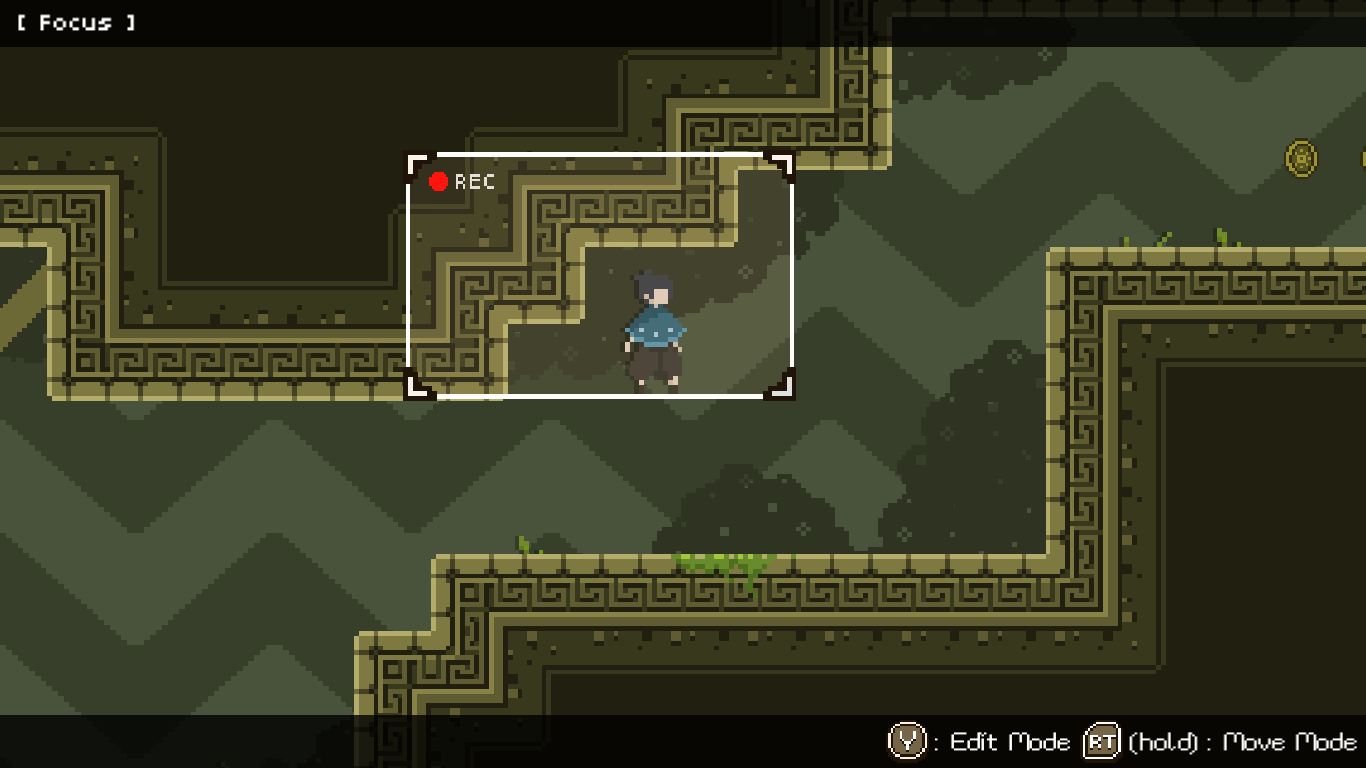
Edit Mode
This is similar to move mode, except with the change in size of the focus frame.
One issue is to prevent the focus frame size to be smaller than the character size, I just need to check if it can actually be shrink before attemping to set its actual size.
Clamping its size to not be bigger than the screen is using the same logic as in the move mode.
World Wrapping Summary
Later on, I apply this world wrapping stuff to the box as well.
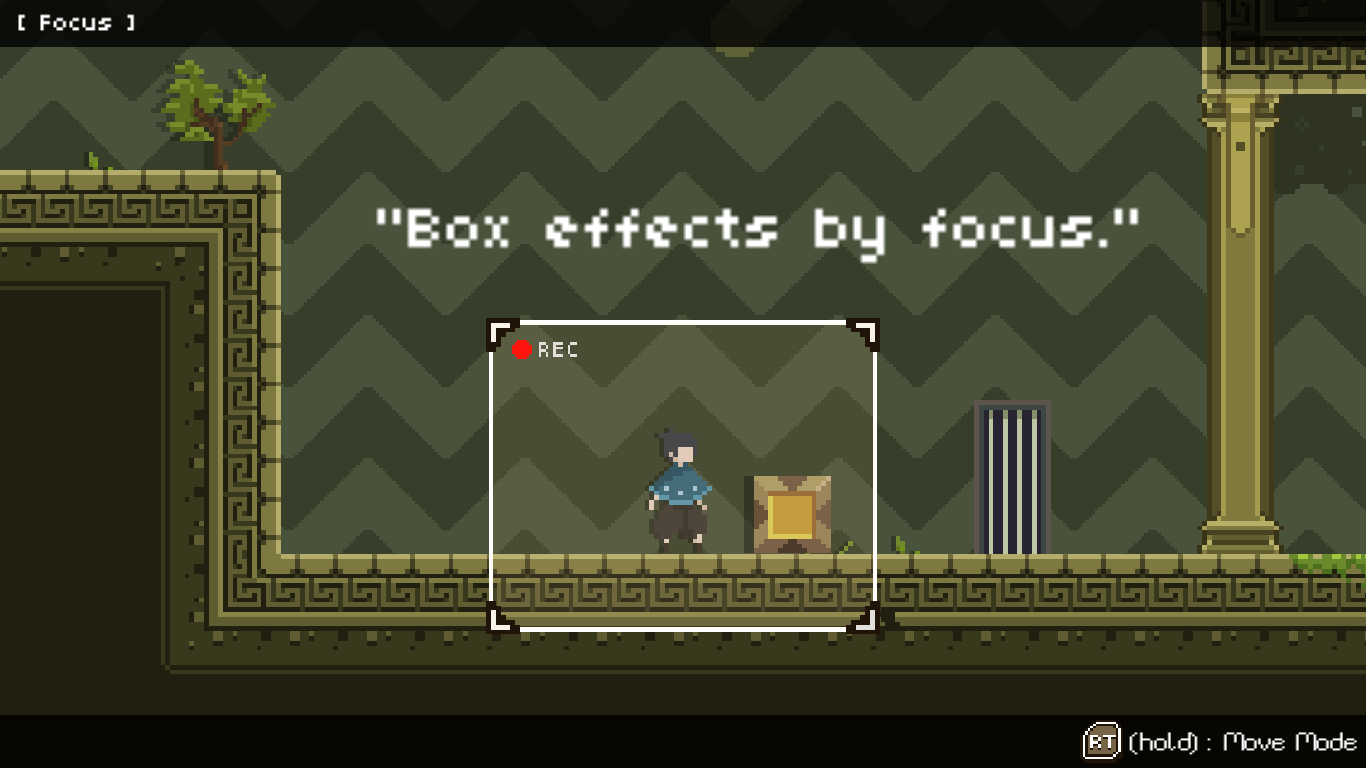
As you can see, this ability complexity is come from the focus normal mode.
Once we went into this rabbit hole and figure things out, It turn to something quite interesting.
The challenge is not only the technical stuff but also a design of the game as well.
This is what I love about making a video game, specifically implementing stuff.
The way you decide to solve the implementation problem has a huge impact in the gameplay.
That’s why when game programmer implement something, not only we have to fulfill the requirement of the game but we also need to think of how system and player will interact with each other.
Some might say, it’s a game feels.
Like for example, if it’s about implementing a jump mechanic. Not only we have to make sure its jump will reach to the certain height, but also how player press their controller and how player character behave on the screen.
GameController Support
As first, I want to use XInput but Unity didn’t support this at that time. There is a 3rd party library that handle this stuff perfectly.
But I also want other platform to use game controller as well, that’s why I implement the input with a built in Unity Input System as a fallback.
There is an issue about a game controller events, I need to know when the player plug in their game controller in order to show the proper key to press in the game ui.
Too bad, Unity won’t provide this for me. I have to do a polling in which it will detect this event based on the change in the name of the game controller in the input devices list.
I have two modes to detect.
One is to keep checking the name each update cycle and other is to keep chechecking only when player press any key.
I end up choosing the update cycle at the end which is more natural for the player in my opinion.
But as a time goes by, I didn’t integrate the 3rd party library.
I keep doing other thing since the fallback solution works fine and I didn’t have a time to actually put some compiler preprocessor to seperate a fallback solution from XInput and test this stuff properly.
Game Progress
This game use JSON as a save file format.
Game will save when player hit the checkpoint.
Checkpoint is just a trigger, similar to the camera trigger.
Since the game doesn’t have much data to save, All of the data that need to be in the save at first will store in the memory.
Once player hit checkpoint, it’ll serialize the data into the persistent data path. The path itself depends on the platform.
I didn’t serialize the whole object, I pick only the necessary data and write a serializer and deserializer myself.
The save will load once player want to continue the game from the main menu.
Every instance that need to restore its state from this save will begin to initialize itself after the scene finish loading.
One thing that I wish I do early is to make the save to disk asynchronously.
It’s one of those thing that I remind myself to fix as soon as possible, but in the end it still not fix.
It’s kinda like a joke where someone implement stuff temporary but end up survive to the production some how. (Which is not the good thing)
Door & Switch
This is really simple to implement.
I just do a bool flag to represent the door open state.
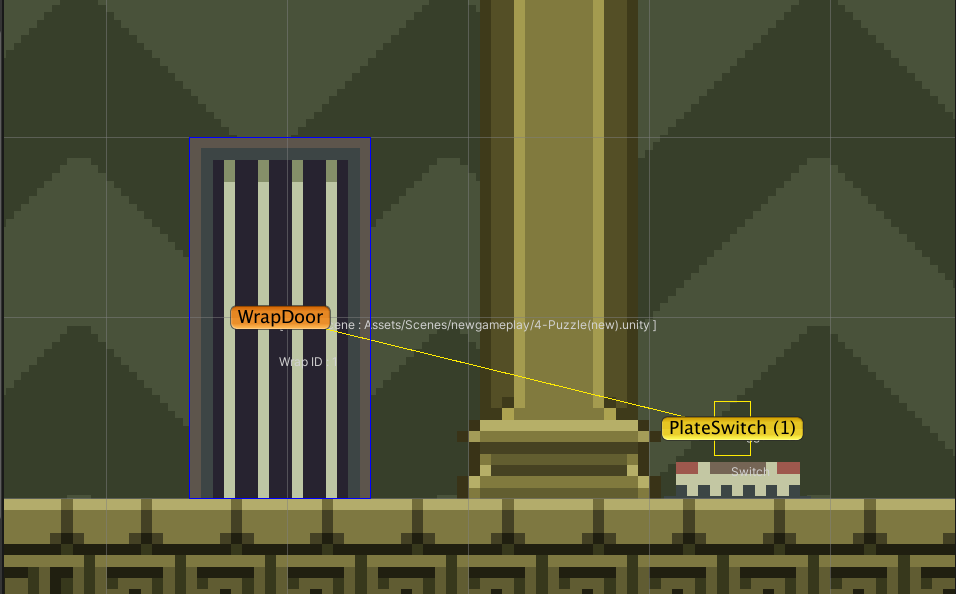
Switch is act as the one bool flag.
All the bool flag need to do an “AND” operation to figure out the door actual state.
The pressue plate switch need to do an overlap testing to ensure the reliable checking of something appear over this switch such as box and player.
Moving Platform
The moving logic is just a simple translation.
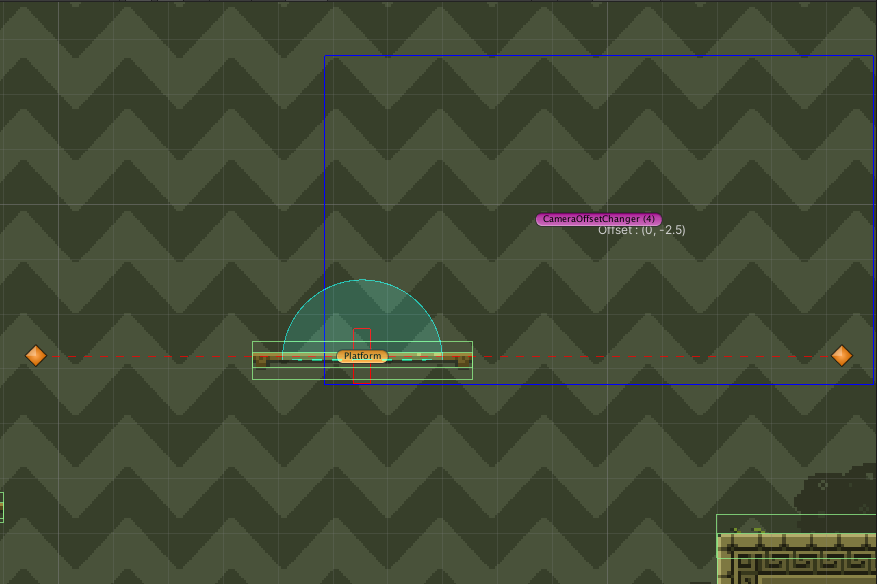
First, it’ll pick a target destination in which is represent by gizmos with a diamond shape.
Then it’ll move along the direction which found by this expression where v2 is a target destination and v1 is the position of the platform itself.
$$direction = { \vec{v2} - \vec{v1} \over \lVert \vec{v2} - \vec{v1} \rVert } $$
After it reach the current target destination, it’ll just pick the next target to make it moving back and forth between targets.
The red dot line is draw by gizmos to help visualize the path that platform will take.
For the One way collision, I use a built in Unity physics engine.
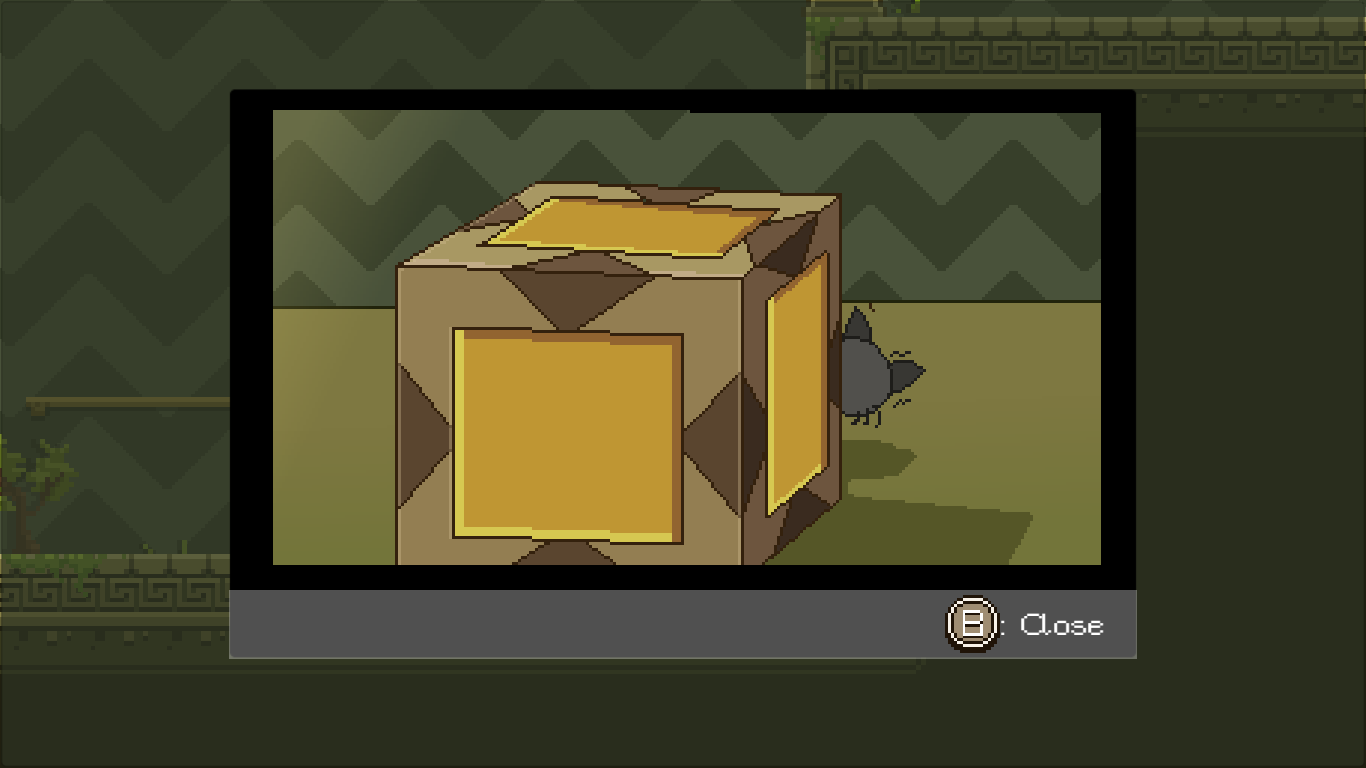
Collectable
Player can pick the coin and photo in this game.
At first, I want to make an acheivement, something like “Collect them all” or “Find all the clue (photo)” to explain why player need to pick these stuff.
Sadly, both I and our artist can’t make this in time.
The coin and photo can be found in the box.
There are some coins that lay around in the level as well, but the issue is player cannot pick multiple coins at once.
And again, I need to make a quick overlap testing (pre-allocate) to detect multiple coins.
As for the photo, it need to integrate with a save file, then it’s just a matter of properly load and restore the collectable progress.
Game UI
Unity Canvas do the jobs nicely.
Whenever I need to update a simple value to show player on the UI, I avoid polling by using an observer pattern.
Also, I avoid Unity Event and its messaging system since it’s slower than manually binding a native C# event.
Loading Screen
This is possible by loading scene asynchronously.
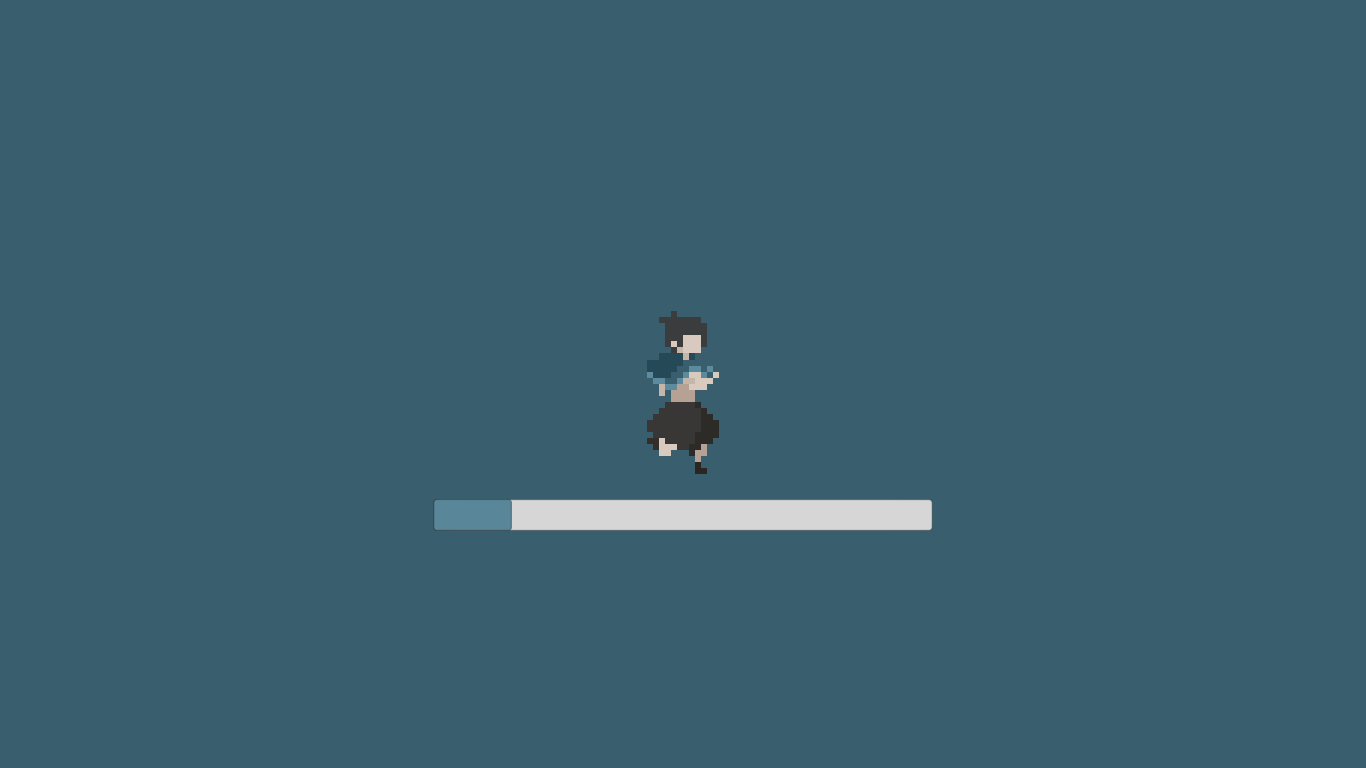
The actual loading progress value in progress bar come from the actual percent that scene has loaded.
This UI will appear once the scene starting to load and dissappear when scene successfully load.
It need to survive from destroying its instance when changing the scene.
So, I Just tell unity to not destroy this instance on load.
This UI do a singleton pattern to reuse it every time the game load a scene.
Custom Editor#
Unity have a way to extend an editor to suit our project need.
We definitely take advantage of this.
These are the tools I built to help reduce our development time.
We cannot hope to quickly iterate our levels and finish this project without these tools.
Save ID Generator
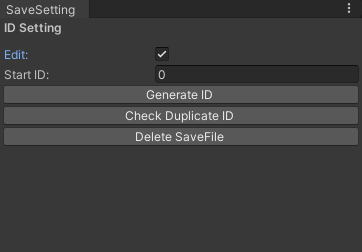
This tools help ensuring our checkpoint to have a unique ID.
Because we iterate a lot of levels in a short period of time, we keep adding, changing its location and removing the checkpoint overtime.
Without this tools, we have to keep checking every checkpoint we place manually to make sure its ID will not conflict with each other.
(Which is really time consuming process)
With this tools, we can check and re-generate every checkpoint ID in one click. This help ensuring our save and load system to work properly.
One of the problem I came across is how to make Unity save the change we made programmatically.
To make this tools work, I have to push our change to the Unity undo stack.
Once our change has pushed, It will set the Unity scene dirty and allow us to save the scene. (I learn this the hard way…)
You can view the implementation here .
Collision & Collider Plotter
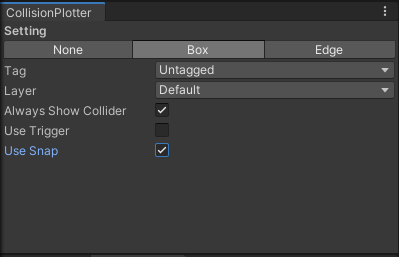
This tools help us create and delete our collision and collider quickly with ease.
We need this tools because of the problem about the way Unity resolve its collision.
Take a look at this example.
![]()
As you can see, each of the sprite has its own box collider.
The problem here is that, player will get stuck at some point when they try to walk on this type of the collider setup.
Despite how it looks, a bunch of smaller box collider cannot provide a seemless ground surface.
Physics engine try to push away each pair of the collider when it detects the collision in each fixed update to prevent them from overlap to each other.

To keep things simple, let assume there are the two possibilities at the moment player collider overlap to the edge of the ground collider.
Vertical Push
![]()
As you can see, the length of overlapping in the horizontal axis is greater than the vertical axis.
So, the quickest way to push each collider away from each other is by pushing them vertically.
Horizontal Push
![]()
In this case, pushing each collider pair horizontally would be the quickest way to resolve this collision.
But this also the cause of the player getting stuck, because player keep getting push back to the opposite way of the way they want their character to be move.
For example, player might be able to walk in the right direction. But as soon as they start walking in the left direction, their character might get stuck.
The ideas box collider setup would be a big box collider to make physics engine resolve collision correctly.
![]()
But, the box collider size also adjust to the same size of the sprite when you add its component to the sprite itself.
So we have to seperate the collider from the sprite by making an empty game object attached with the box collider component.
Placing this ideas box collider with an existing Unity tools is really time consuming.
Not only we have to keep our box collider size right, we have to place this in the proper distance (make it snap to the grid).
The way I do this is using the fact that I can construct a rectangle by using only two points.
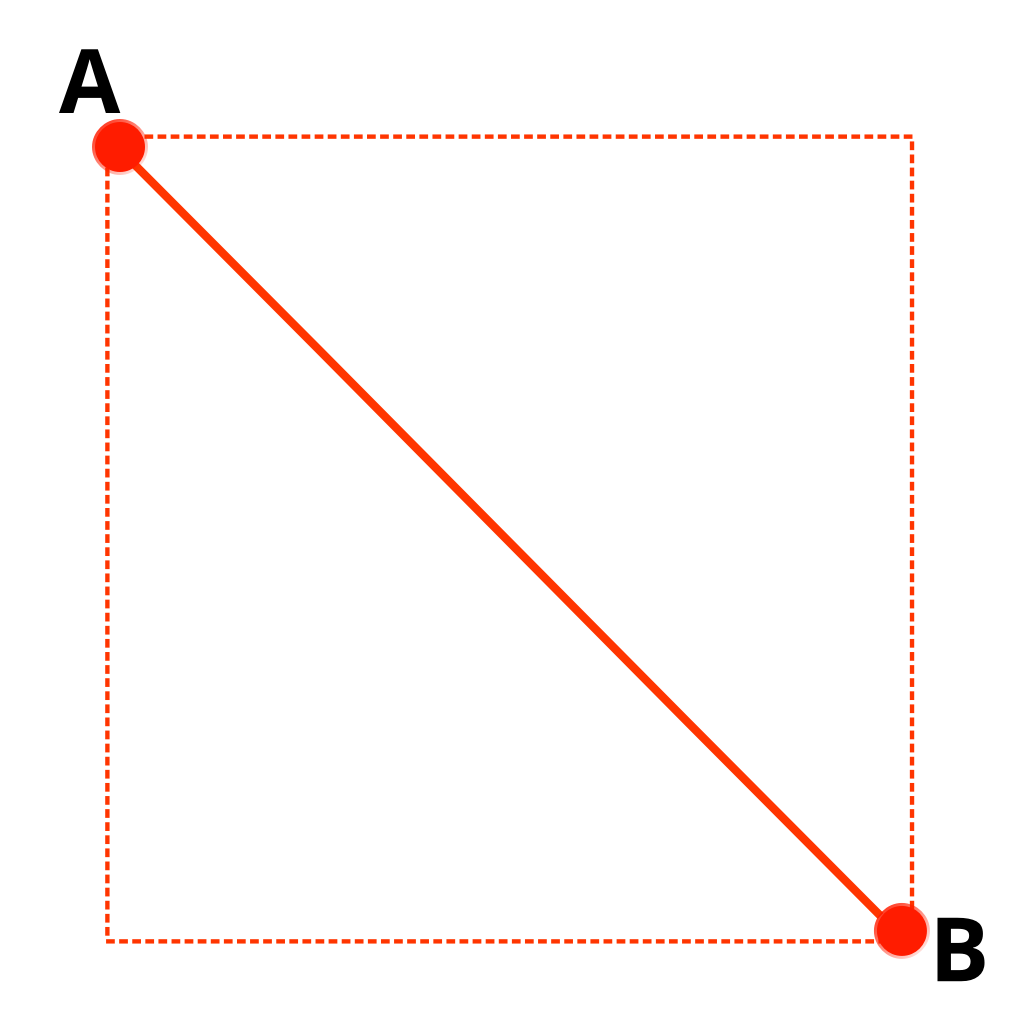
And the grid itself is just the default Unity scene view grid.
This tools also help us placing the necessary collider to represent the ground material to help playing the right sound of player footstep.
You can view the implementation here .
Sprite Plotter
![]()
This tools help our artist to quickly place the tilesets.
Since we use a pixel art style for this game, We need to make sure each sprite will align properly within the grid.
At that time, Unity already have a tools to help place the tilesets.
Unfortunately, We don’t want to use its solution.
Not only it techically still in the beta, but also the amount of work we have to do in order to prepare our sprite is way too much for our use case.
We just want to snap our sprite to the grid. ( for god sake… )
That’s why this tools was created.
The placing sprite logic is similar to the Collision & Collider
Plotter.
One issue I have to deal is to prevent too much waste in the game object when placing the multiple sprites that use the same texture.
Lucky for me, I can change the sprite draw mode to tile to make texture repeat itself to fit the size of the sprite.
This help us reduce game object count to just one per multiple sprites.
Later on, I add the brush profile to help group our tilesets together. Make it easier for the artist to choose the tilesets.
This is possible by the fact that the assets need to generate its own Global Unique Identifier (GUID) when import to the project.
So, I just need to retreive its asset guid then save it in the JSON format.
You can view the implementation here .
Scene Selector

This tools help us play testing the game from the start without having to leave the current scene in the editor.
This feature is what I wish to be built in to the Unity Editor.
But sadly, it’s not…
So, I have to implement this myself.
Let’s assume I set the scene name “Introduction” as the first scene in the build setting.
But I open the scene name “Level5” in the editor.
If I hit “Play” button in the editor, Unity by default will play a current scene. In this case, It’s a “Level5” scene.
If I want to start playing from the “Introduction” scene, I have to close the “Level5” scene first and then have to manually open the “Introduction” scene before entering the play mode.
Which make me frustrated overtime.
So, this tools keeping me sane while play testing dozen of times.
You can view the implementation here .
How we design a game pacing#
Once we finished interating a lot of levels and decide which level to keep in the game, we connect all the levels based on their difficulty and start play testing from the beginning.
Not only to estimate how much time player need to complete this game, but also wanted to see how each level feels when connect to each other.
We re-arrange the order of each level if it necessary and take a note when player starting to feels repetitive.
Then we introduce the new ability or some shift in the game mechanic when player feels repetitive the most.

( This image is a rough approximate of how this game pacing works )
I strongly disagree about front-load tutorial, so the first two phase of the game was crafted with extra care to make sure that I introduce player to the game properly.
The idea is simple, introduce player to the concept in the smallest fashion rather than overwhelm player with too much information at the given time.
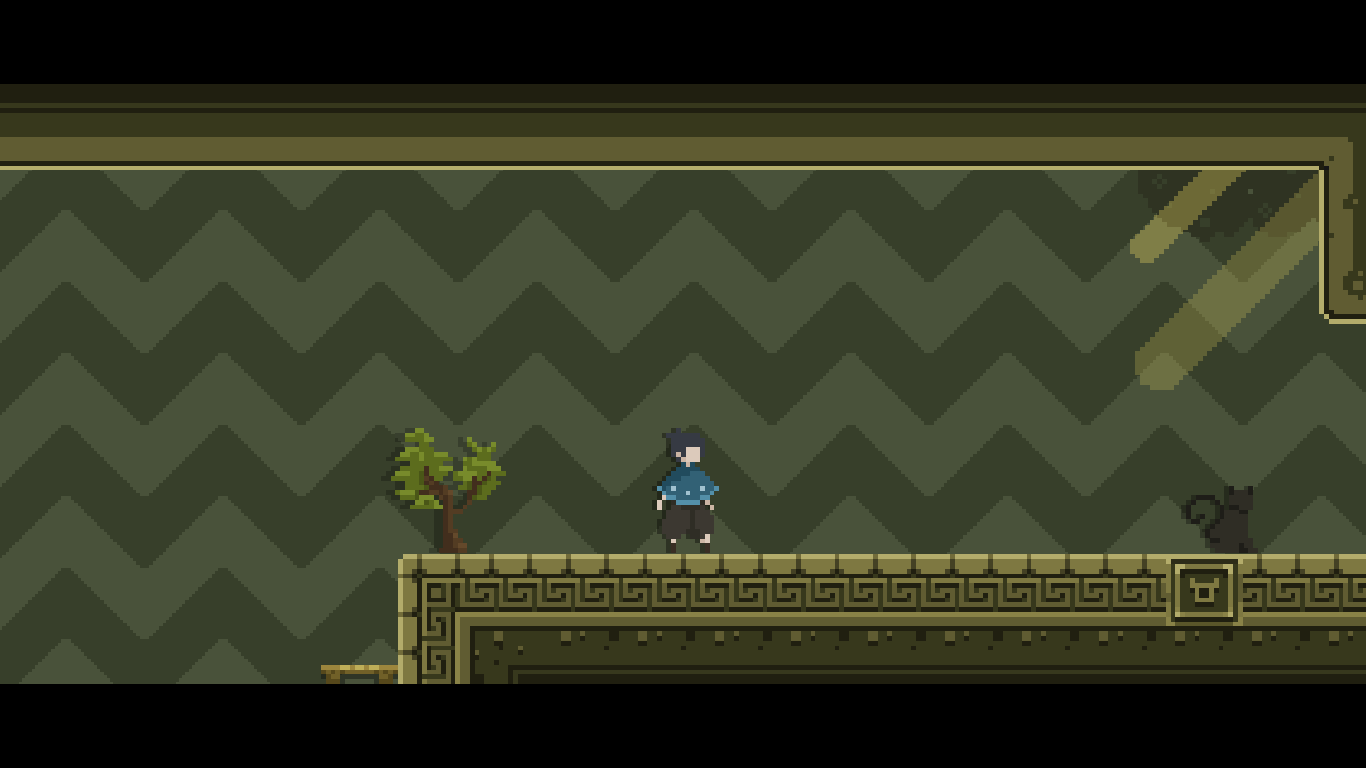
Beginning Phase#
The main goals of this phase is to make player familar with how to control their character. No mind bending stuff or fancy mechanic would get introduce yet.
At first, I place the level in such a way that player will know exactly which way to proceed. (Just keep going right)
Then I make player warm up their jump by introduce a little platform session.
Then, the game will play a tiny cutscene to remind player about going to the right.
Finally, make sure that player know about the high jump (hold a jump button) by placing a taller wall as an obstacle in which player need a box to support the height.
So, this introduce player about how to push and pull a box in the process.
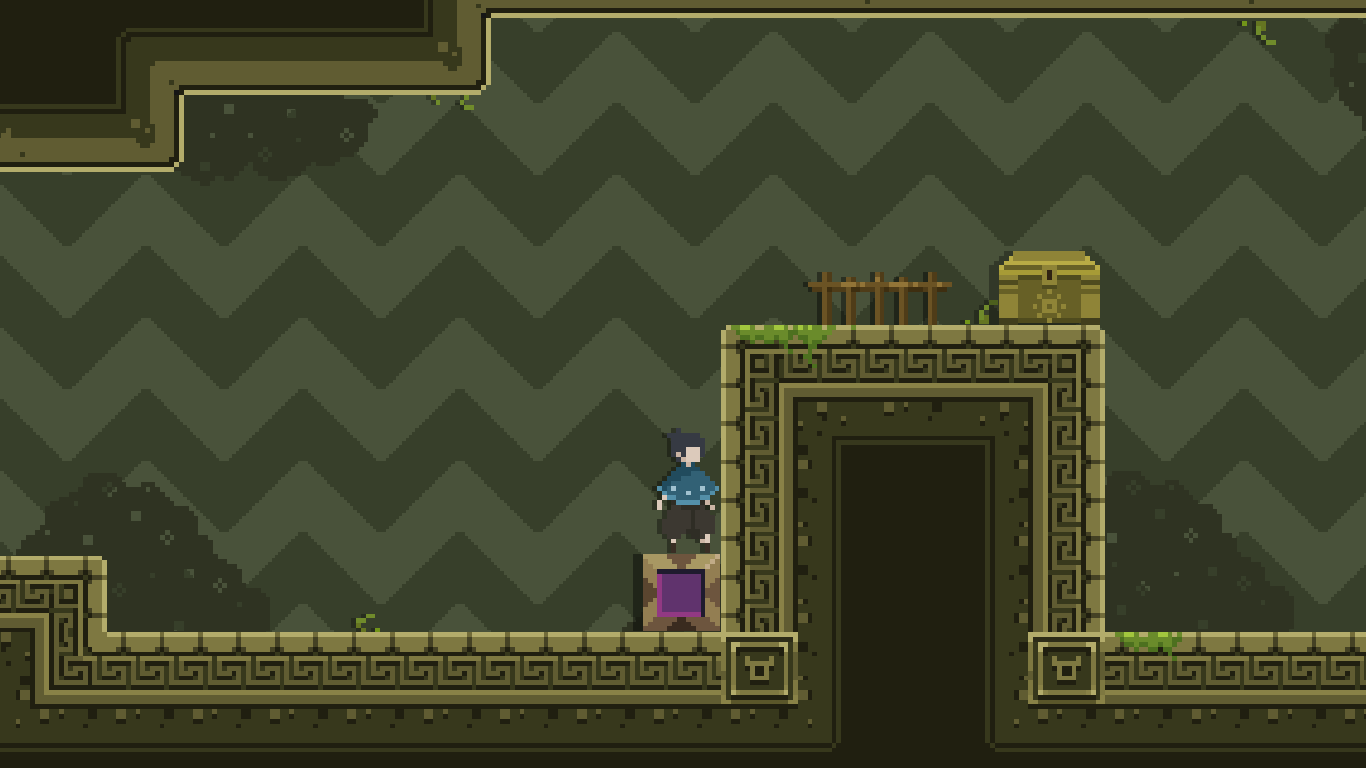
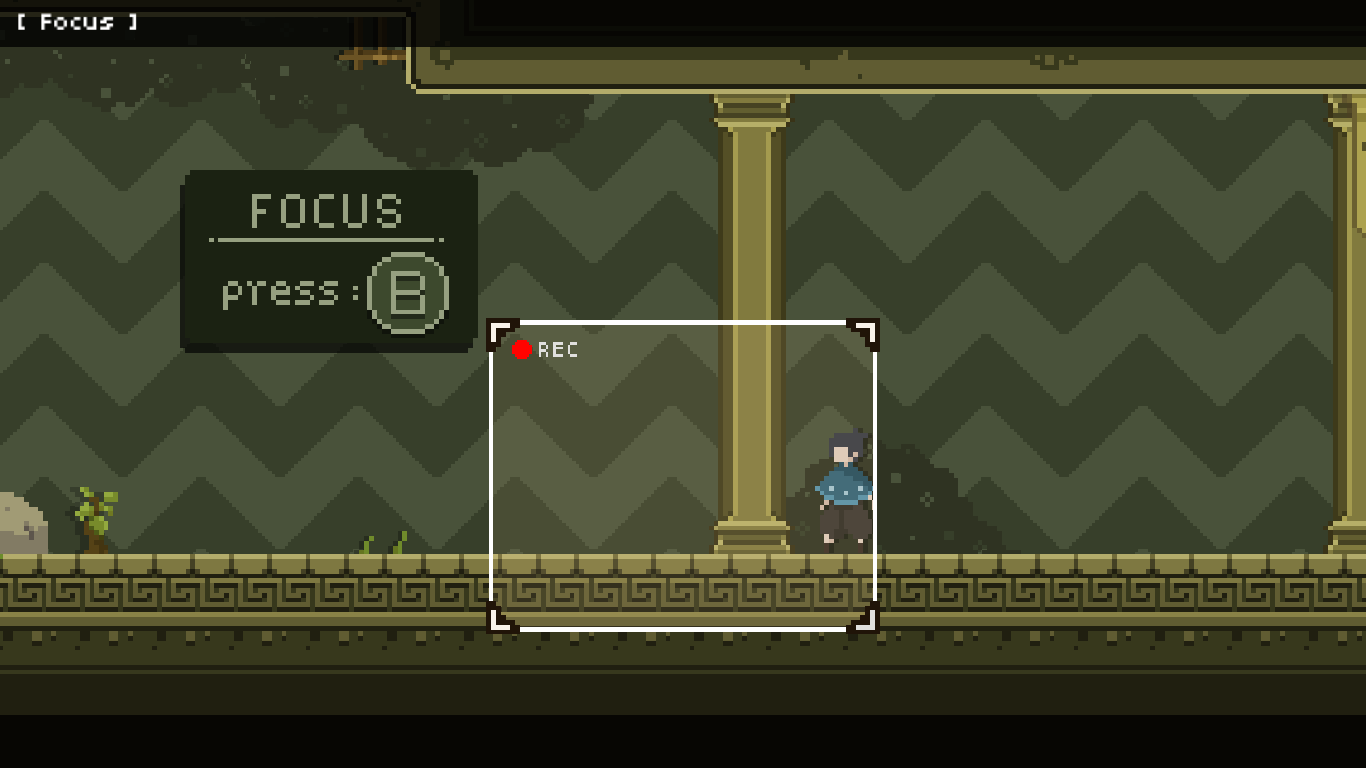
Tutorial Phase#
This phase is to make player understand the basic principle of the main mechanic. Especially, the focus ability.
This phase also explain the limit of the focus ability as well.
At first, I throw player in the situation where they need to use the focus ability in order to proceed.
Not only it help player to understand what it capable of, but also how to use it to solve the puzzle as well.
After that, I introduce its limitation right away. Player need to think a little bit in order to proceed.
Then, I teach player about how pressure switch works with a door.
If player use the focus ability, it will wrap them back exactly at the top of the switch. Introduce the pressure switch and how it work in the process.
So, player will start to think about how useful the box would be.
Later on, I occasionally remind player about how focus ability work. And introduce other limitation of the focus ability.
In this case, It’s about the position of the character when start using the focus ability matter.
Increase difficulty to the highest#
After a lot of simple puzzle to solve that didn’t involve the player timing at all in the tutorial phase, things starting to shift.
At first is to play with the player timing, they need to activate and disable the focus ability at the right time in order to proceed.
Then things will slowly getting harder and weirder, slowly increasing the difficulty to the highest possible.
Give player some new abilities to play along the way to keep the game fresh.
And it keep getting harder and harder until the most challenge puzzle in the game.
Slowly Decrease difficulty to the end#
After the most challenge puzzle, things will slowly decrease in the difficulty.
But the time player took from the most challenge puzzle to the final level is not long enough and player need more time to cool their head after those challenge.
So, I decide to just suddenly drop in difficulty in the final level. Because in the player mind, they just got enough of the puzzle at this point.
In the end, it’s coming together nicely.
The game took about 10 minutes to finish if player know how to solve those puzzles.
Not too long and not too short for the game session.
Getting the most out of final round#
In the final round, we have only 10 days left to complete this project.
So we decide to make the most out of it.
One issue that keep ourself to not work as fast as we would like to be is how we keep forgetting how much work left for us to do.
And there isn’t a way to tell each person progress, unless we ask each other.
That’s why we spent a whole day to just listing all of our work and adapt a kanban board.
Our kanban board rules are simple.
We have Backlog, Todo, In-Progress and Done.
Backlog: is for the task that we need to complete, but it isn’t the main focus right now.
Todo: is for the task that we currently focus. You can put 3 tasks at the maximum into this section.
In-Progress: is for the task that currently working on. You can put only 1 task at the time into this section. And you have to remove the task from this section if you stop or finish the task.
Done: is for the complete task.
And the top piorities tasks will be tag with a label “urgent”.
With this board, we can finish most of the necessary tasks.
You can view the board here .
Conclusion#
There are some crunch times during this project.
I got no sleep at the last day of the competition.
But overalll, I have fun finishing this.
Thank you everyone for playing this game.
Shout out to my team and all of our supporter, This project won’t be possible without them.